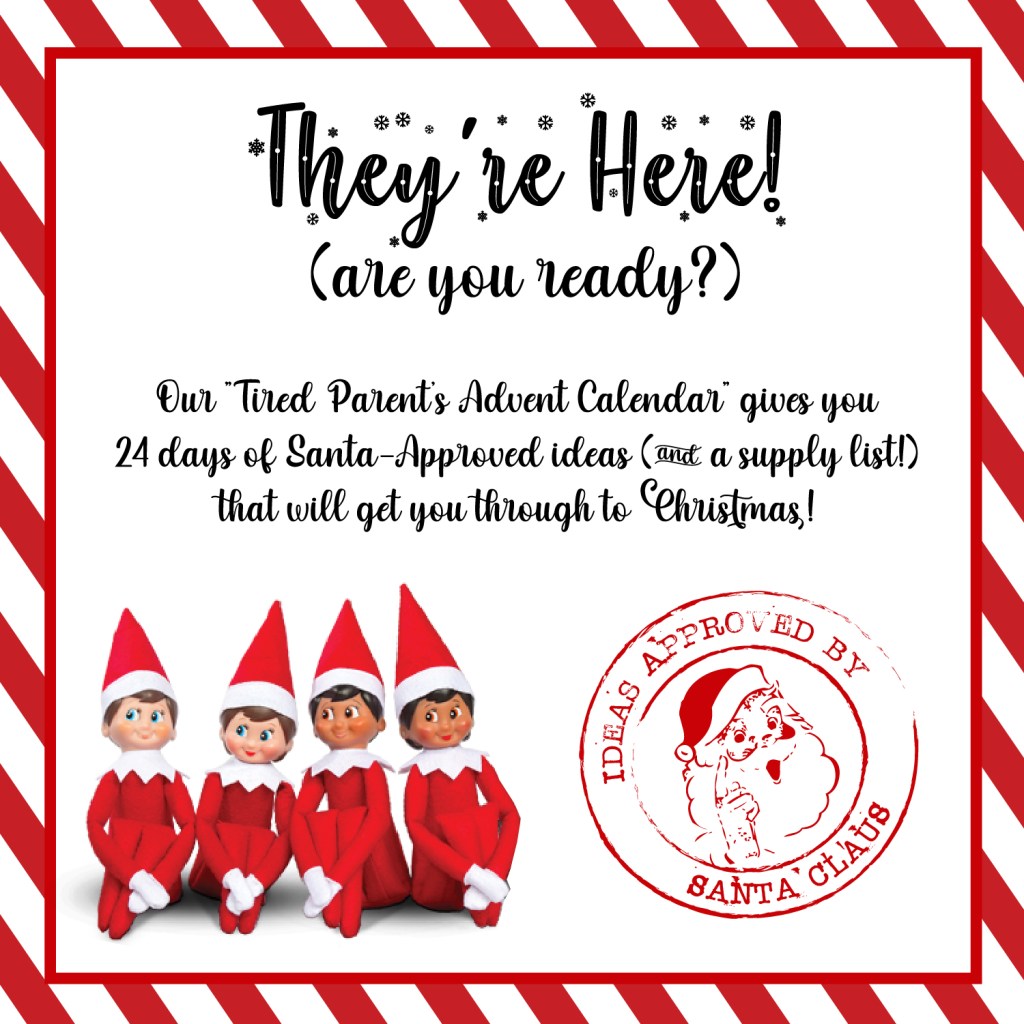
The holiday season has arrived, and with it comes the return of The Elf on the Shelf. That probably makes you feel either: 1) excitement for creating this year’s new and mischievous scenes with your elf or 2) extreme anxiety over the prospect of having to throw together 24 elf-displays at the end of the night when you’re dead-tired. Either way, we’ve been there! We’ve scoured the internet and Pinterest images the same as you trying to find those ideas that are both utterly delightful and super-simple to create- all with supplies you have readily available when you’re in your pjs at 11pm at night.
So, we decided to put this blog post together and give you streamlined, creative ideas for making daily Elf presentations that your kids will love! In addition to daily photos and set up instructions, we’ve also put together a short and sweet supply list (so you’ll have everything on hand for the month) and free printables galore! The best part is, each idea can be made as Pinterest-worthy (or not!) as you want to make it. It’s our daily “Advent Calendar” gift to you (why should the kids have all the fun?): 24 days of Elf on the Shelf ideas you can be prepared for and quickly set up…so you can get to bed!
A Little Preparation Goes a Long Way
Here are some items to have on hand to be prepared all month for your Elf-ventures. Most of these you probably already have at home, and if not, most can be substituted! We’ve included quick links to Amazon products for most of the supplies we’ll be using in our daily posts.
Food Items:
Crafting Supplies:
Other Supplies:
- Chalkboard or Whiteboard
- Photo Paper/Printer Paper
- Picture Frames
- Gift Bows
- Toilet Paper
- Hatchimal CollEGGtibles or Play Sand Dino Eggs
- Toothpicks
- Cotton Balls
- Tin Foil
- Wrapping Paper Rolls
- Advent Calendar (any type)
- Elf-Pets Reindeer, St. Bernard, or Arctic Fox
Daily Elf-spiration
You can follow along with these ideas as much or as little as you like, and can always substitute a day (or two or three!) of putting your Elf up on a shelf. If, on the other hand, you’d like to get extra-creative with your daily ideas, we’ve added details on how you could do that as well! Be sure to check back daily for the idea-of-the-day and the free printables we’re offering!
December 1 – Count Down to Christmas and “I’m Back!” Greeting Card
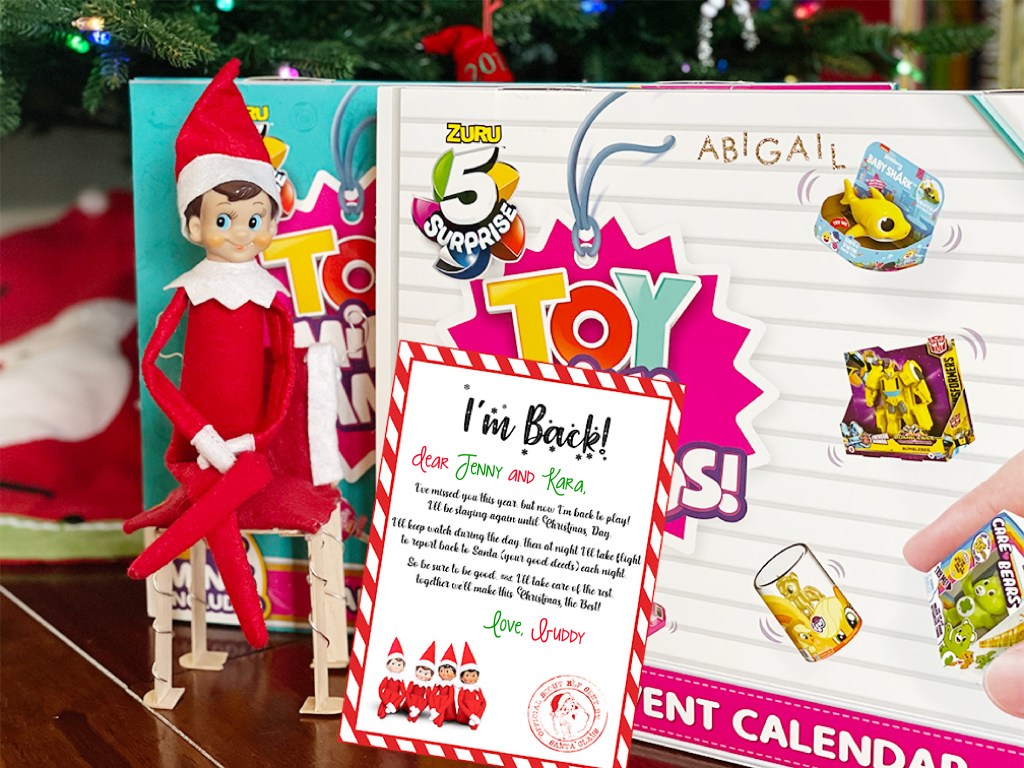
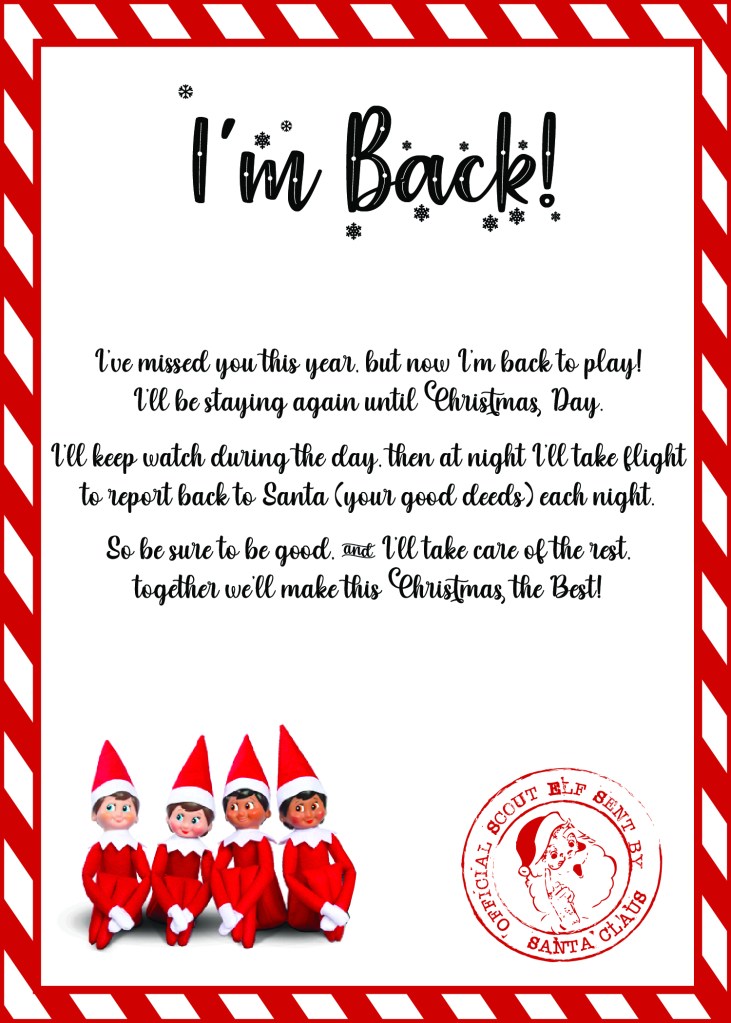
We love having our Elf bring advent calendars as a little surprise gift on the first day he arrives (we used these). The kids really look forward to this yearly tradition of counting down the days until Christmas arrives. With so many options out there to choose from, it’s easy to find something everyone likes.
Then, print out this 5×7 card as a fun, Santa-approved greeting from your Scout Elf that tells how excited he or she is to return to your family’s holiday celebrations this year. Use the blank space on top to write your child’s name and then sign below with your Elf’s name to personalize your card to your family. Since our printable card is just a greeting, it can be used with or without an Advent calendar!
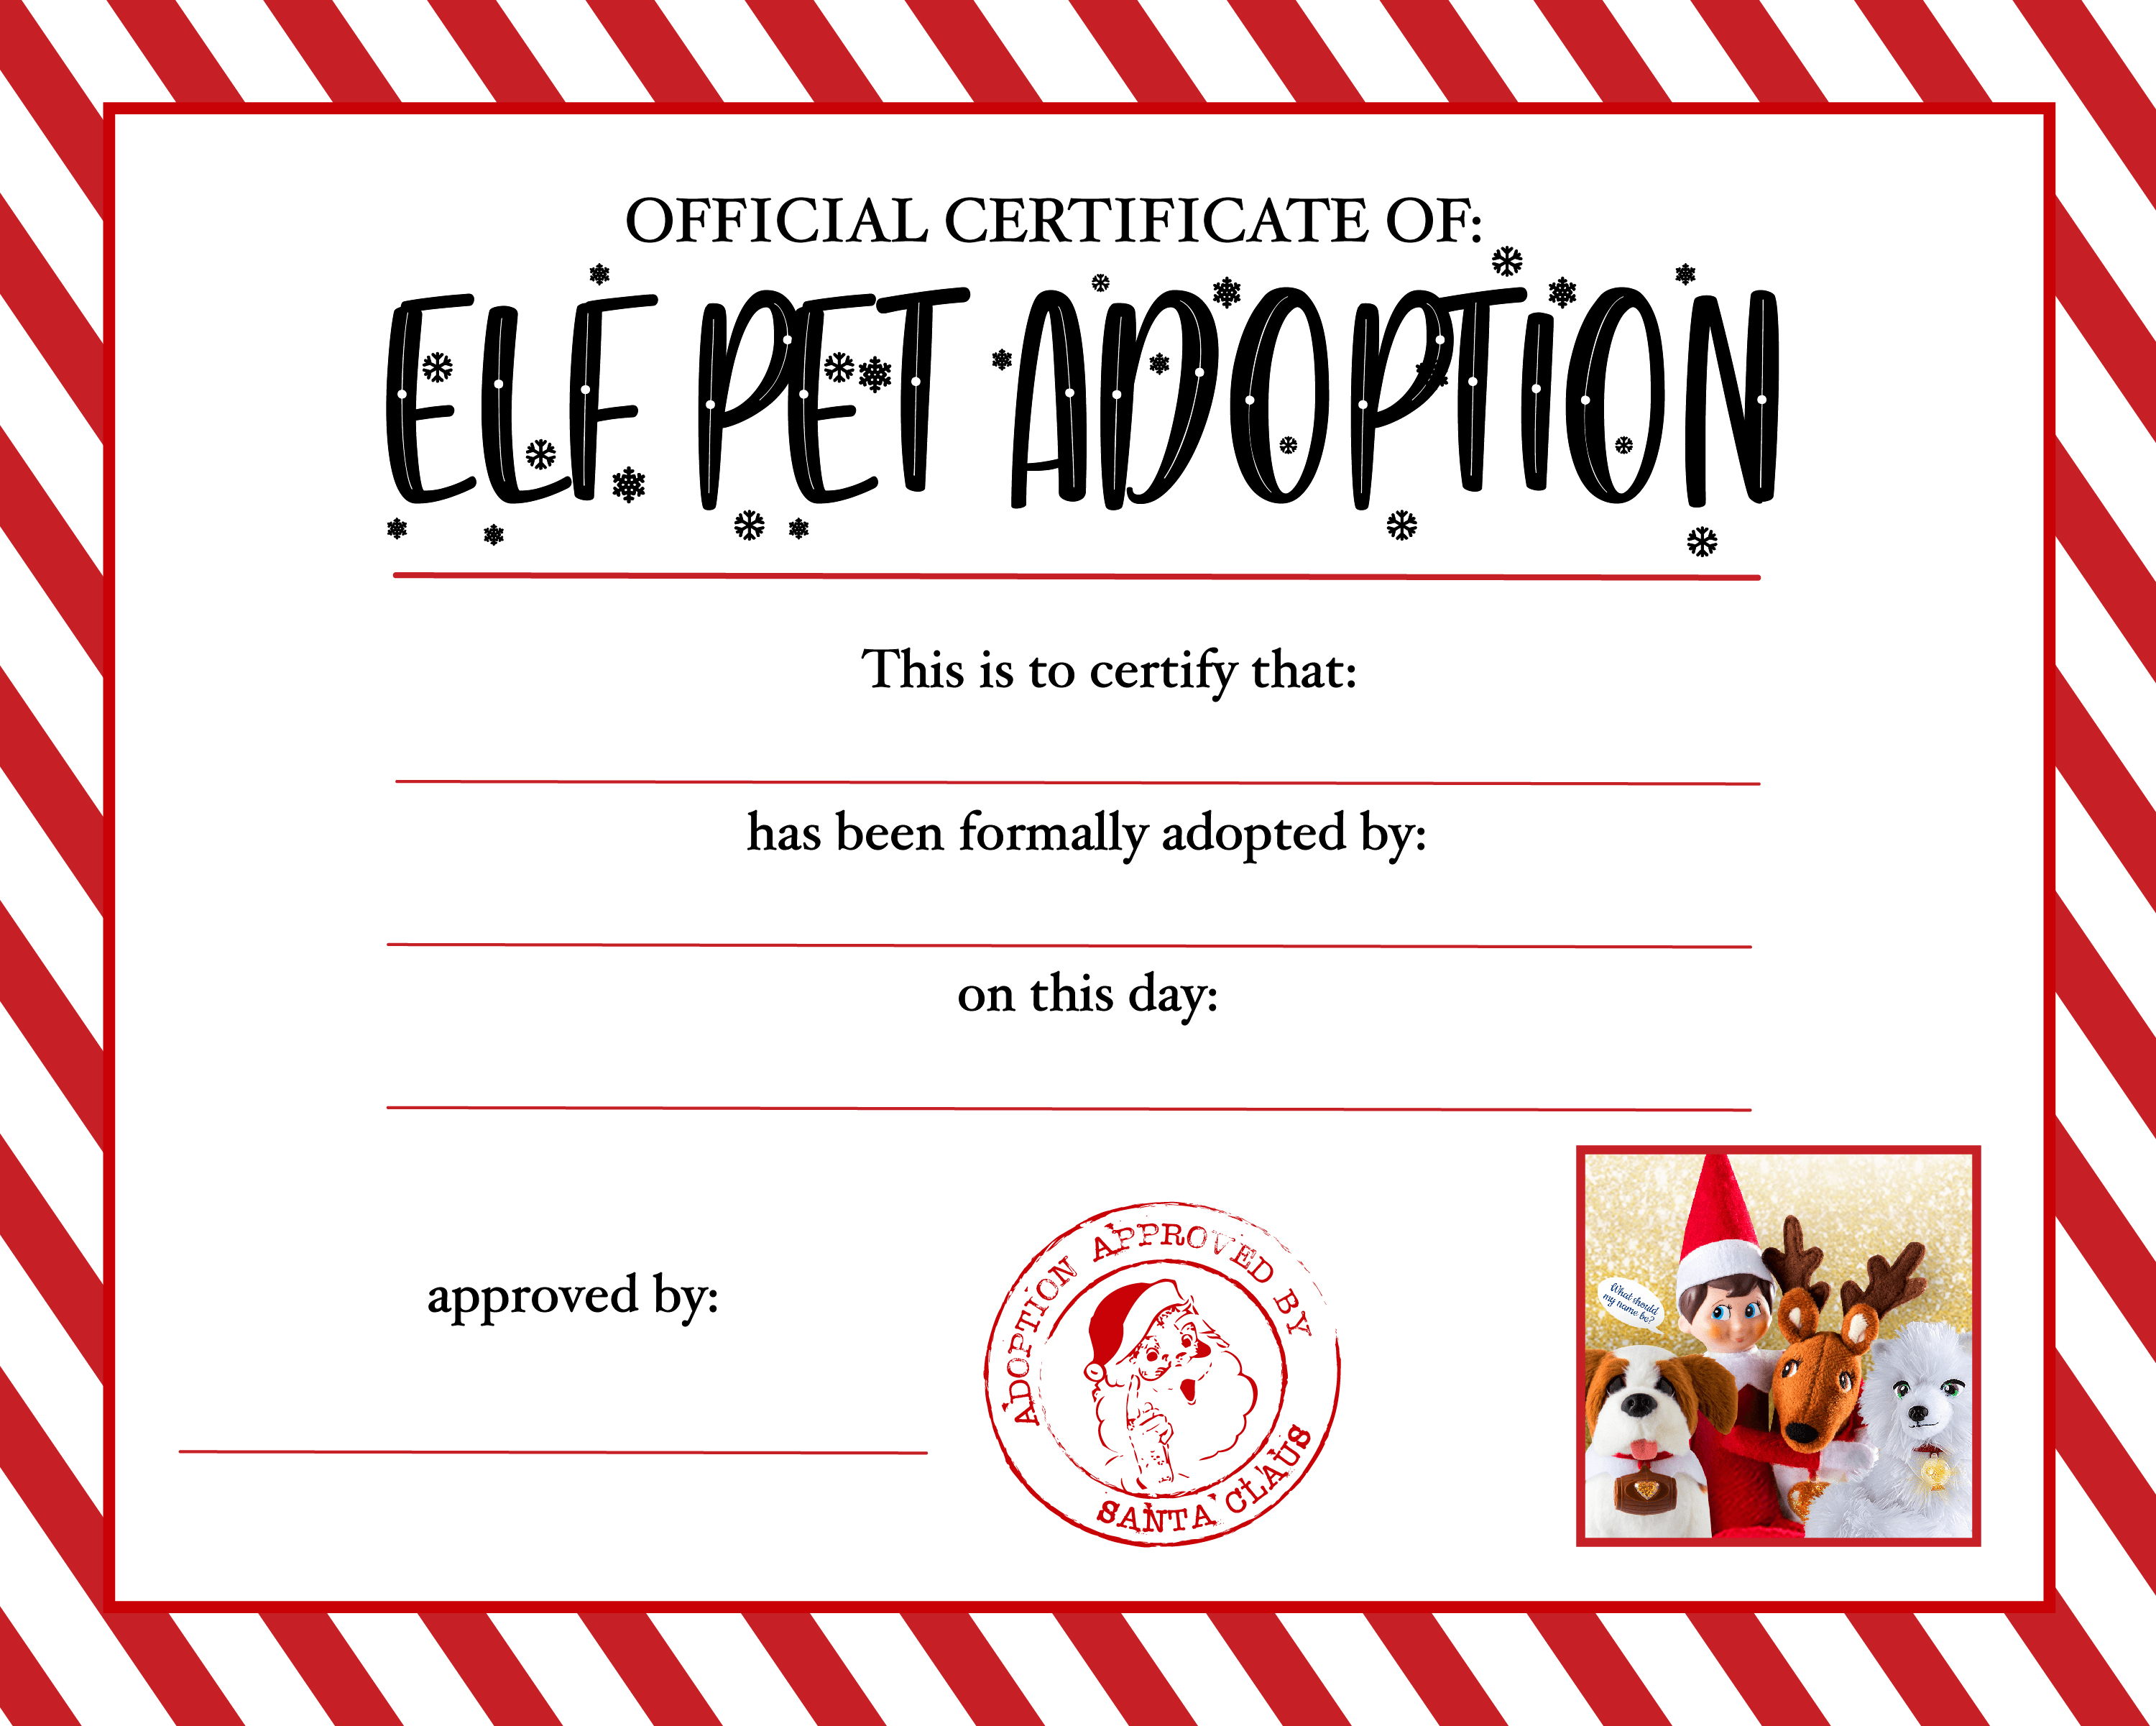
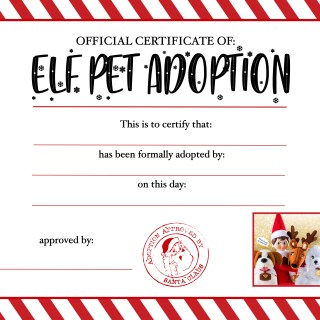
December 2 – Pet Adoption & Papers
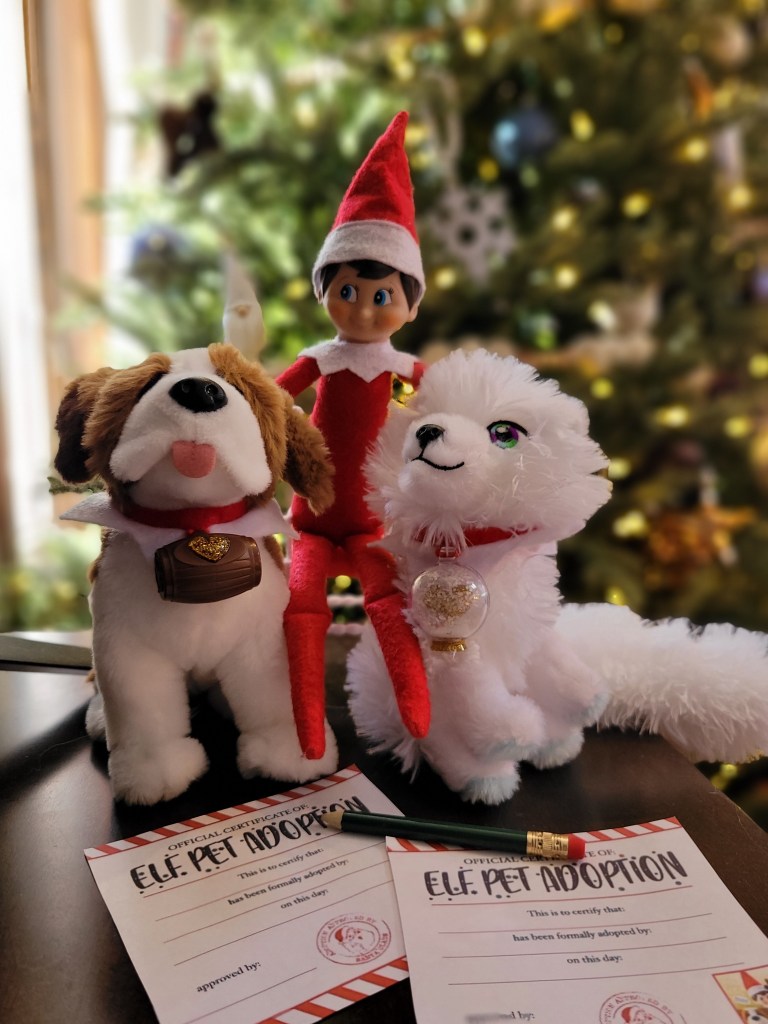
This year the kids wanted to have our Elf adopt some pets, of course we had to make it equal so I bought two. We bought the pets before the Elf arrived so my kids had them unboxed and ready to go. The fox may have even made it into our dog’s mouth a time or two as well!
If you are bringing an Elf Pet into your house this year, use this printable adoption certificate for you or your child to fill out. Place the Elf and his/her pet(s) in a special place (away from dogs that like stuffies if unboxed) for your children to find in the morning. Enjoy!
December 3 – Do you want to build a Snowman?
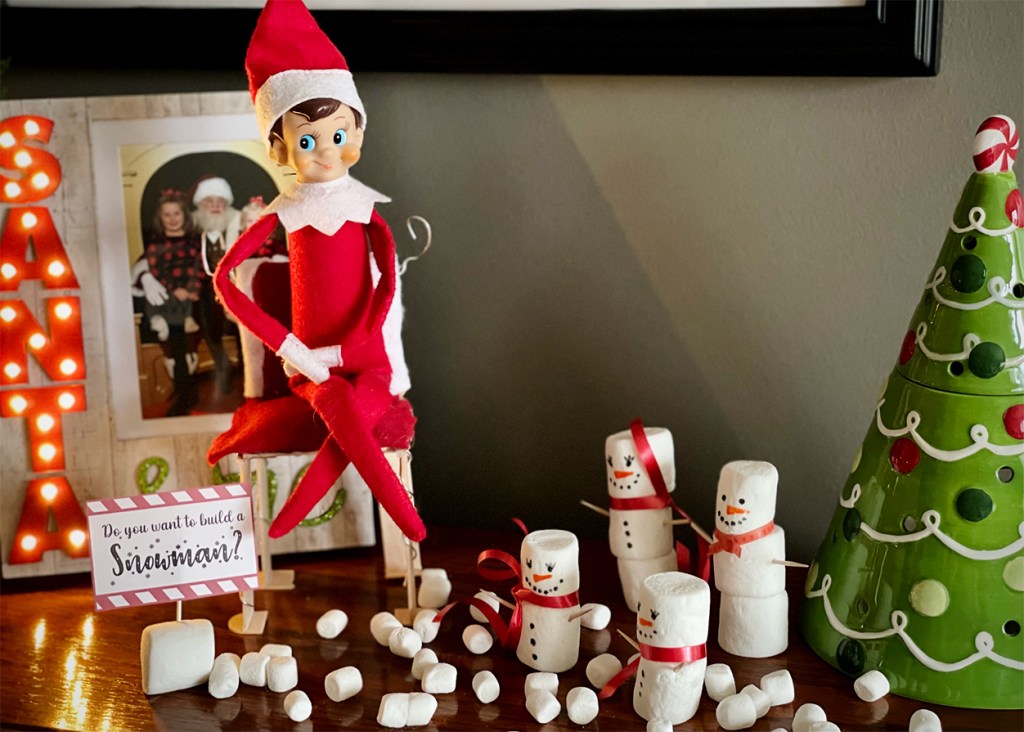
This idea is so adorable and easy! Toothpicks hold the snowmen together, and the mini marshmallows complete the “snowy” look. Add a bit of curling ribbon around the snowmen’s necks to get a little extra-festive! We decided to do 4 snowmen (one representing each member of the family), complete with “eyelashes” for the mom and girl snowmen, and a washi-tape bowtie for the dad snowman. Edible food markers made quick work of the snowmen’s details, but regular markers would also work (just be sure no one eats those marshmallows!).
Our printable “Do you want to build a Snowman” sign is just cut out and taped to a toothpick! This display only took about 10 minutes to complete, and was well worth it in the morning when the kiddos were nibbling mini-marshmallows and gushing over our Elf and his adorable snow-family!
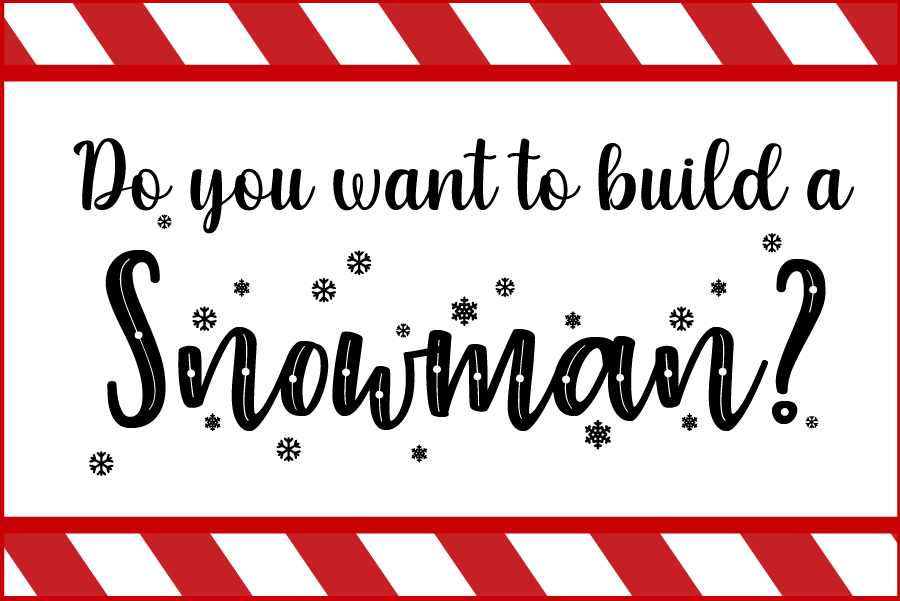
December 4 – Banana Graffiti
This is a great idea when you are low on time and inspiration! You can use any type of fruit in this instance – oranges would be super cute! Grab a permanent marker and go to town, drawing faces, messages, etc on the fruit. My son really thought this one was hilarious!
I also wrote a quick note on the last banana (not seen) to make sure the Elf Pets were being taken care of. My kids took his advice and took the pets out to breakfast today! Nevermind that we almost lost Biscuit, our St. Bernard!
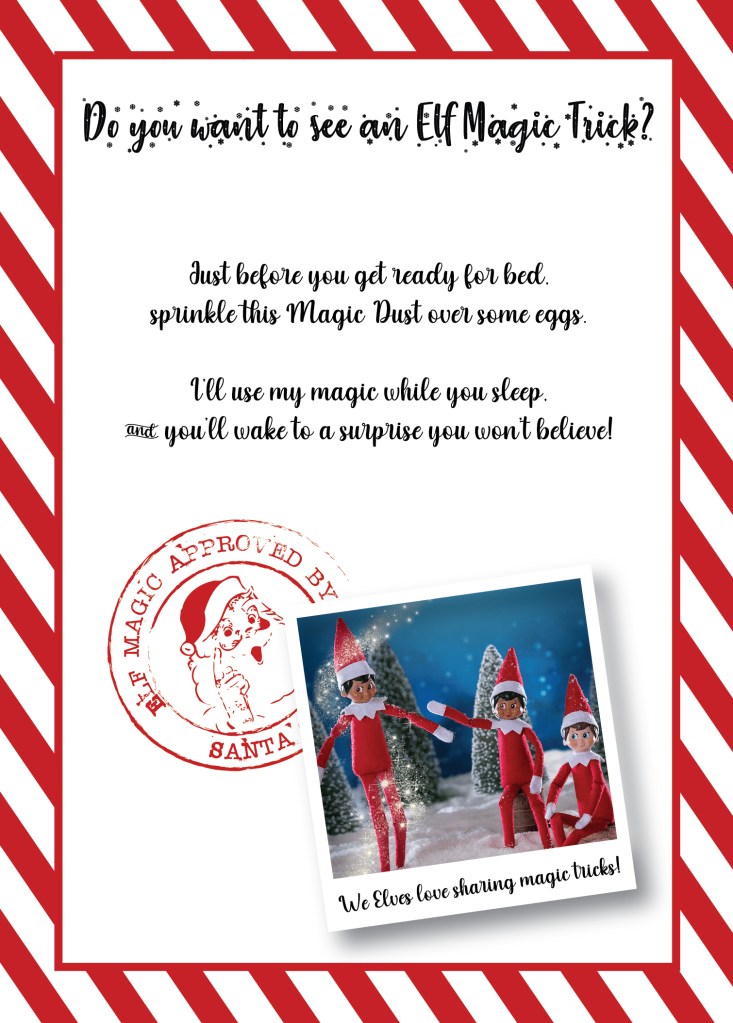
December 5 – Elf Egg-tastic Magic Trick (BONUS: This idea allows you to leave your Elf in one spot for 2 nights!)
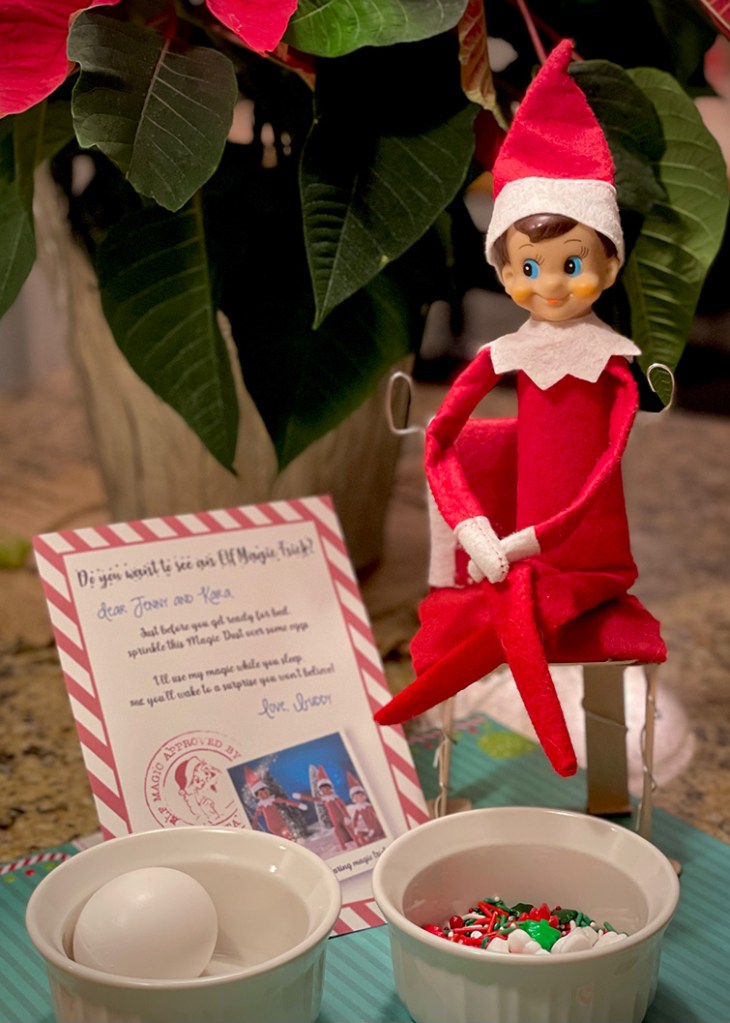
This idea takes a little bit of planning ahead to be sure you have the supplies to pull it off, but it is well worth it when your kids see what your Elf’s magic created for them while they slept! Not only that, if offers grown-ups a little magic too: this idea is the perfect excuse to leave your Elf in the same spot for 2 nights! Woohoo!
For the first morning, have your Elf show up sitting next to some eggs in a bowl, and some cupcake sprinkles in a second, separate bowl. Use our printable note, which tells the kids to sprinkle a bit of the cupcake sprinkles over the eggs. (To avoid wasting perfectly good eggs, you could also leave the egg-bowl empty, then get them out for the kids right before bed.)
Once the kiddos have sprinkled the eggs in the bowl and are sound asleep in their beds, you can then swap out the food eggs for some type of toy egg (and put the real eggs back in the fridge!)!
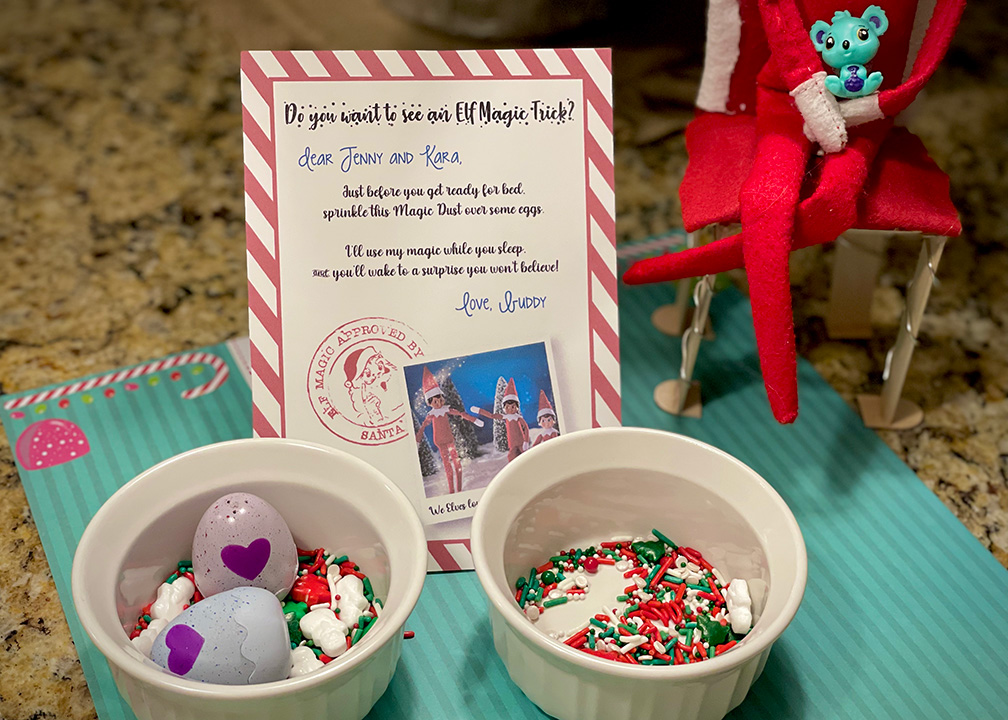
On the second morning, your kids will wake up to the toy eggs that replaced the sprinkled eggs. In our version, we used holiday themed cupcake sprinkles and swapped our food eggs with Hatchimals CollEGGtibles egg toys. Play Sand Dino Eggs are another great example of what you could use!
My girls really loved this Elf idea. They were so excited to sprinkle the eggs and couldn’t wait for the next morning to see what “magic” would happen. It’s not often the kids get to actually interact with their Elf, so this really made them feel like they could “play” with him! And, any time we parents can get a night off from thinking up Elf shenanigans, it’s a win! (Just please don’t forget to swap the eggs for a toy surprise on that second night!)
December 6 – Teepee Tree Shenanigans
The Elf was up to no good last night again! I was able to get this one done in just a few minutes and the kids were super entertained by this idea! You’ll just need six (same) lengths of toilet paper (length is up to you), tape, and something to attach it to the lighting, ceiling, etc (I used a medium sized safety pin to attach it to the light fixture).
First, find your spot to hang the tree. I decided to hang them from our dining room light fixture so it wouldn’t be tempting for our dog to tear down. Also, if you happen to have a robot vacuum you may want to find a place to keep it off the floor as well. You could also just teepee your Christmas tree or house plant if you are having a hard time finding a place!
I added a piece of tape to attach all 6 pieces of similar length toilet paper together on one end. Once the toilet paper was secured together at one end, I added a medium sized safety pin to hang it from the light. I propped the Elf on top of it and made sure he wasn’t going to fall during the night. Finally, I splayed out the end of the toilet paper to make the tree shape. My kids were thrilled with the hijinks the Elf pulled and are excited to see what he’ll do tonight.
December 7 – Look How Young We Were!
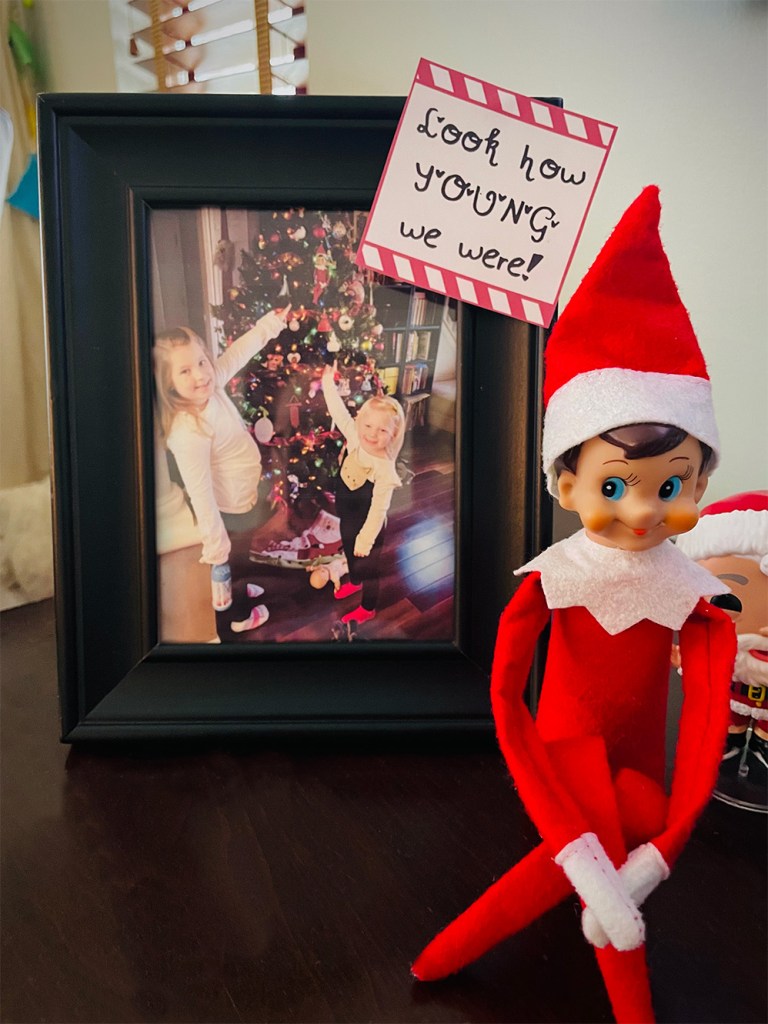
This idea is perfect for those nights you need something quick and easy for your Elf. Print a photo from Christmases past featuring your kids with your Elf, and include the message: “Look how YOUNG we were!”. Almost every kid has heard this phrase when older family members feel nostalgic over photos from years past, so this is a fun twist on that idea.
For our version, we put our photo in a 5×7 frame, but this could easily work with just the printed photograph. Your Elf could even write his or her note right onto the photo, complete with an authentic autograph!

If you’d rather use a printable note, we’ve included this one for download. I know my kids can recognize my and my husband’s handwriting, so printouts with creative and unexpected fonts are a lifesaver in our house!
My kids loved seeing themselves so young in a past photo with our Elf, and also loved the silly handwriting in the note. Hope you have as much fun with this idea as we did!
December 8 – A Note to Santa with Elf Delivery
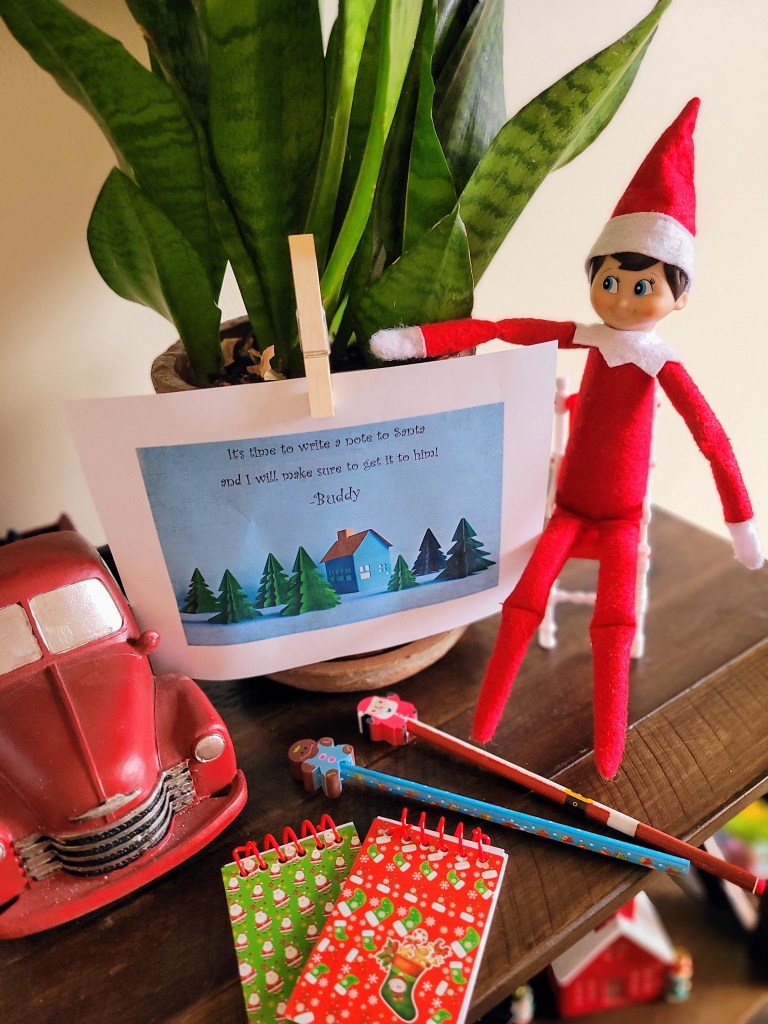
This is another simple one that I think you’ll appreciate. The Elf leaves a note for the kids to write a note to Santa that he or she will deliver overnight. It could be their list or maybe just a nice “saying hello” note.
Just type a note up (if you have a hard time disguising your handwriting) or just handwrite a note from your Elf to the kids explaining what to do. Leave some paper and pencils and have them write a letter/note to Santa. This year Jen was kind enough to give me some extra Santa themed pencils and pads, but in years past I put out stationary or nothing at all since we have tons of paper and writing utensils laying around the house. I was feeling extra this year.
My kids already started their letter to him this morning. I’ll plan on having them leave the notes with the Elf before they go to bed tonight. Just remember to make sure the Elf does indeed “take the notes to the North Pole”!
December 9 – Washi Tape Tic-Tac-Toe
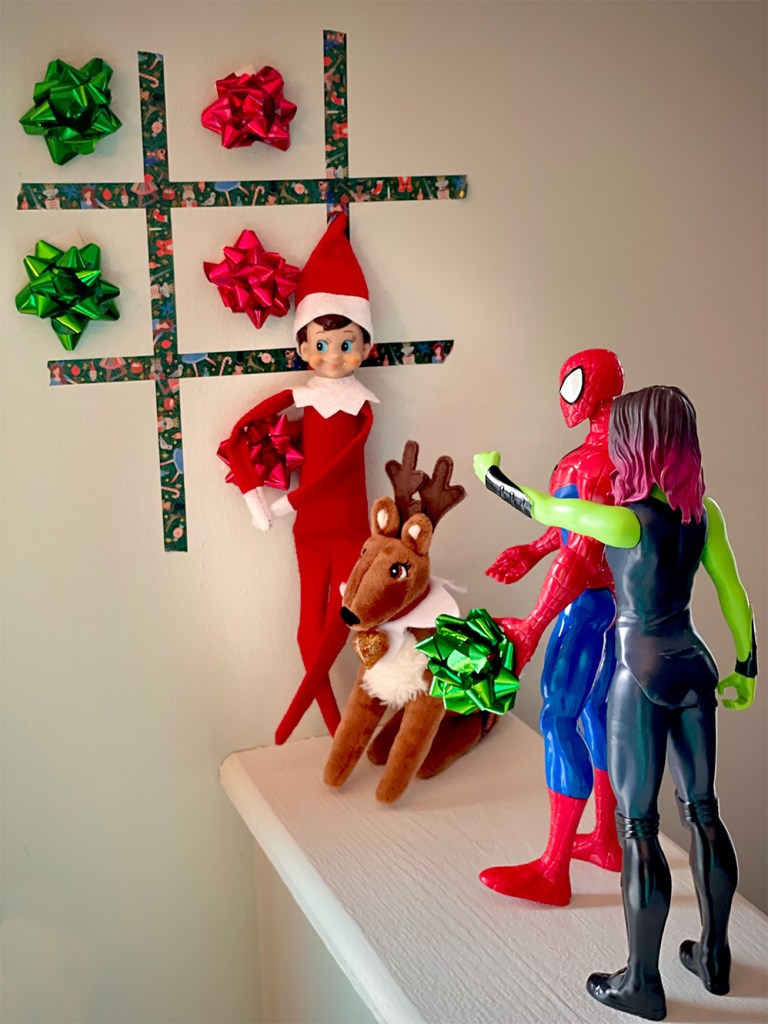
This is one of my favorite Elf scenes because you can bring in your child’s favorite toys to “participate”. All it takes to finish this idea is a bit of washi tape and some holiday bows. I really like using washi tape for this because it easily sticks/unsticks to the wall without leaving behind any residue.
Once you have your tic-tac-toe game is set up and the tape is secure on the wall, stick a few of the bows into any game play configuration you choose (you can use rolled up bits of washi tape for this as well). Then, bring in some “characters” to compete with your Elf. It’s up to you to determine who “wins” and who “loses”!
We love everything Marvel in our house, so I chose a couple of the girls’ Marvel action figures to play a round of tic-tac-toe with our Elf and our Elf Pets Reindeer. The girls really got a kick out of the scene, where Spiderman and Guardians of the Galaxy’s Gamora look to have lost the game! There are so many playful ways to present this idea – we hope you have much fun with it as we did!
December 10 – Elf Spa Day
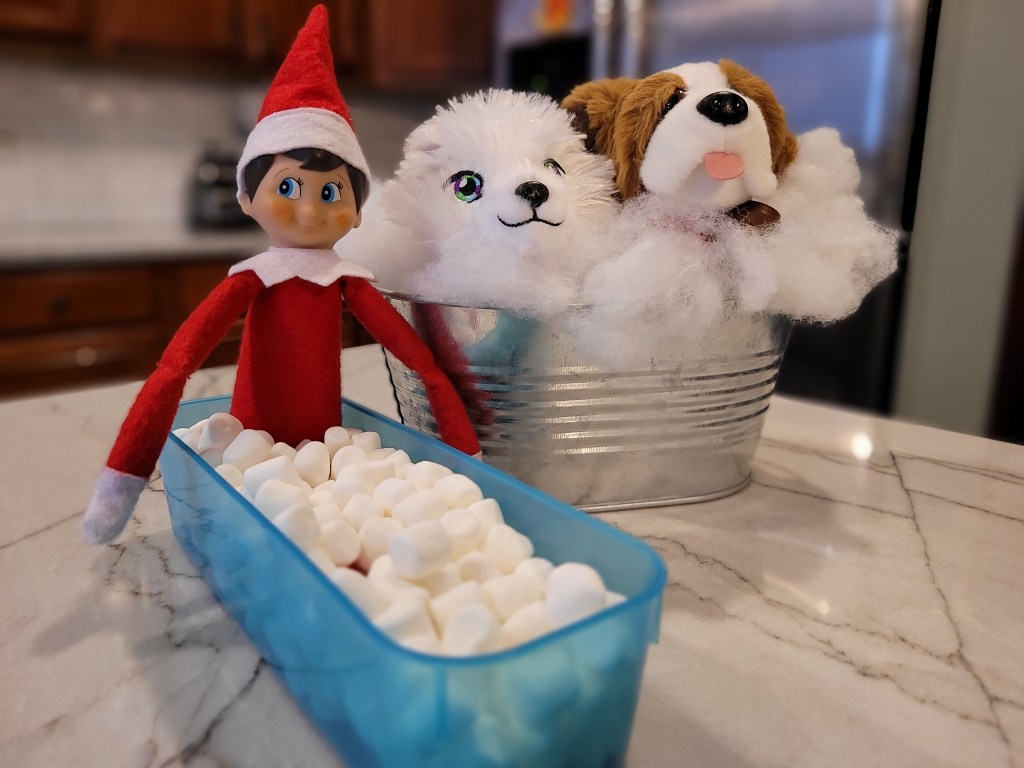
The Elf always has a spa day while he visits our house! This year his pets joined him! This one is super easy – a small container and some mini marshmallows is all it takes! If you have Elf pets that want to join the fun, find a container and something to “soak” them in too.
I took two small containers that were lying around the house (1 from an organizer and 1 small aluminum tub). I added the Elf and poured on the marshmallows. In the tub, I added the two pets and put some pillow fill fluff in with them. The kids really enjoyed that the pets got to get their own spa day in! If only I could get the kids to enjoy their baths as much!
December 11 – Elf’s Gift Exchange
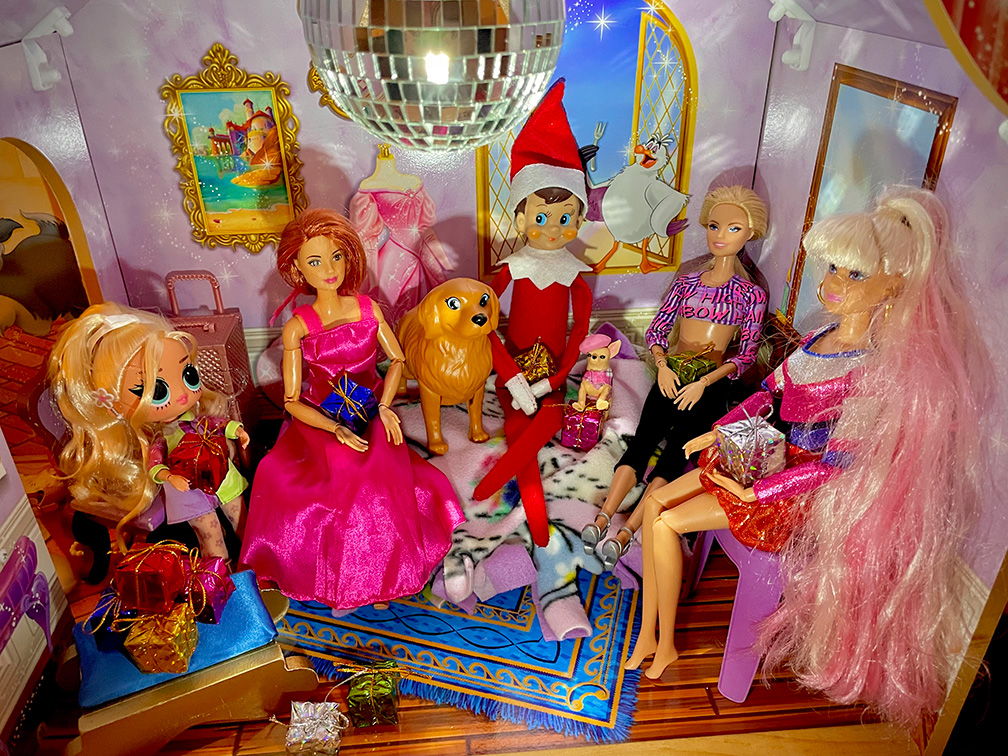
Our Elf is such a social butterfly! He makes so many friends every year when he comes to visit us, and is so sweet to remember to bring all of them a little something from the North Pole. To set the stage for this Elf scene, use the toys and accessories you have on hand around your house. For our setup, I chose some of their favorite Barbie and LOL dolls (and the pups, too!) to use in this Elf gift exchange.
We used these mini craft gifts as presents for the dolls. They come out of the package just as you see them in the photo, and are perfectly Elf-sized. After arranging your Elf’s “friends” in a cozy, festive place, all you have to do is place a gift in each of their laps! As a bonus, your kiddos will have fun playing with the little gifts long after the holidays are over!
December 12 – Naughty or Nice List
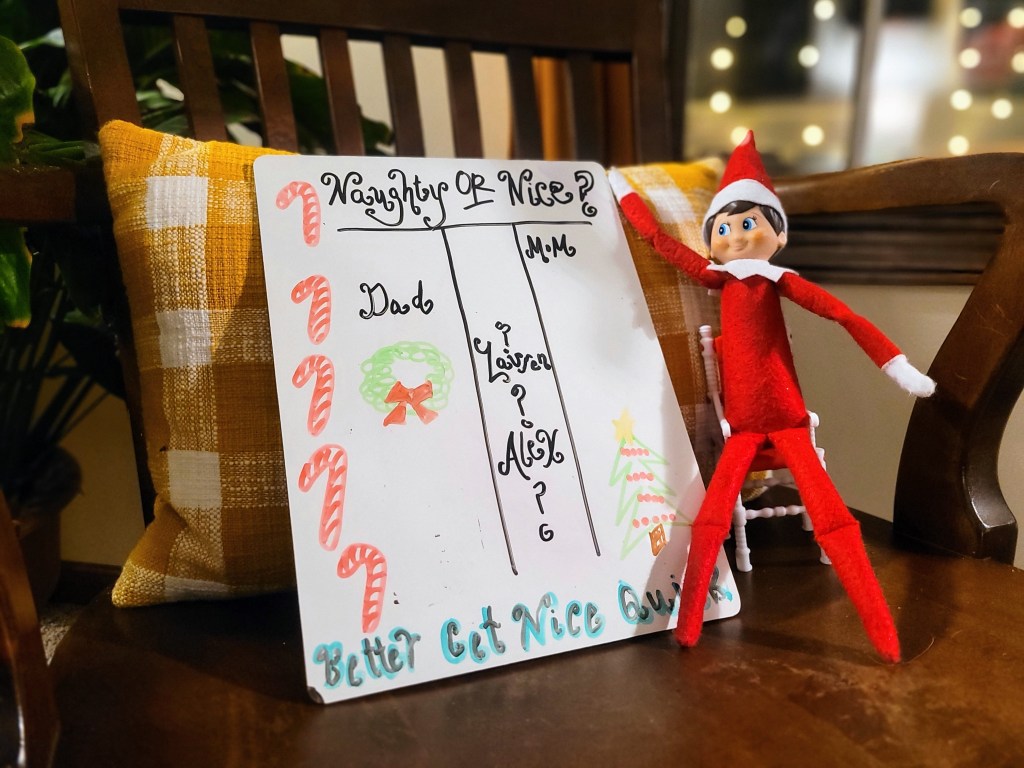
Our Elf wrote up a Naughty or Nice list last night! I made the cut but everyone else is up for consideration. The only items you really need are a small dry erase or chalkboard and markers/chalk. You could even just draw the list up on a piece of paper! I am all about simplicity with the Elf and this one fits the bill.
December 13 – Secret Glitter Message
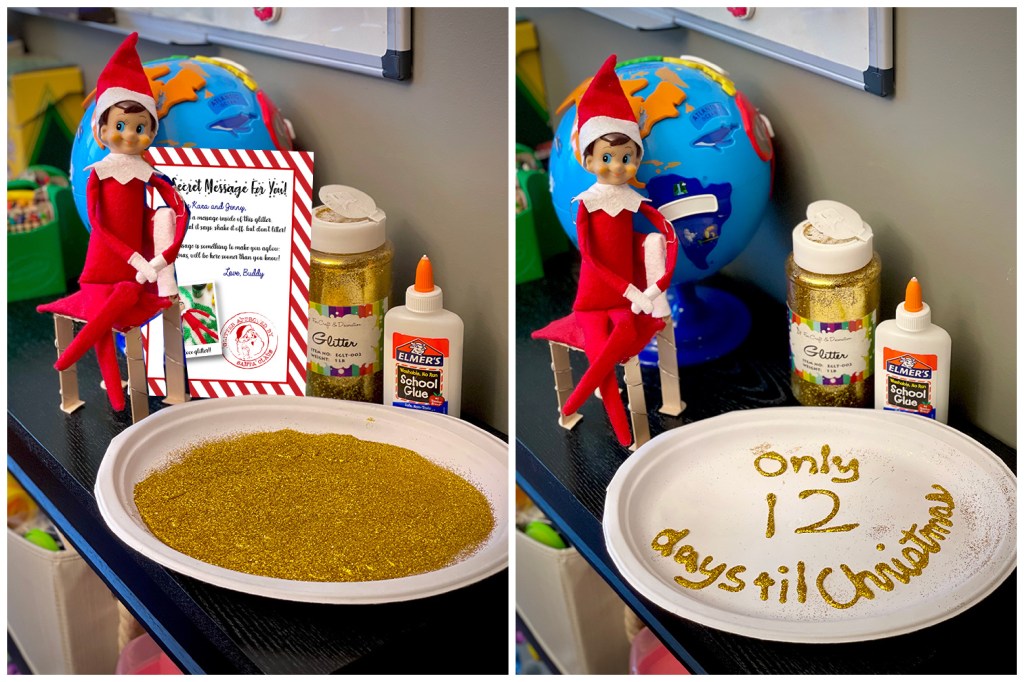
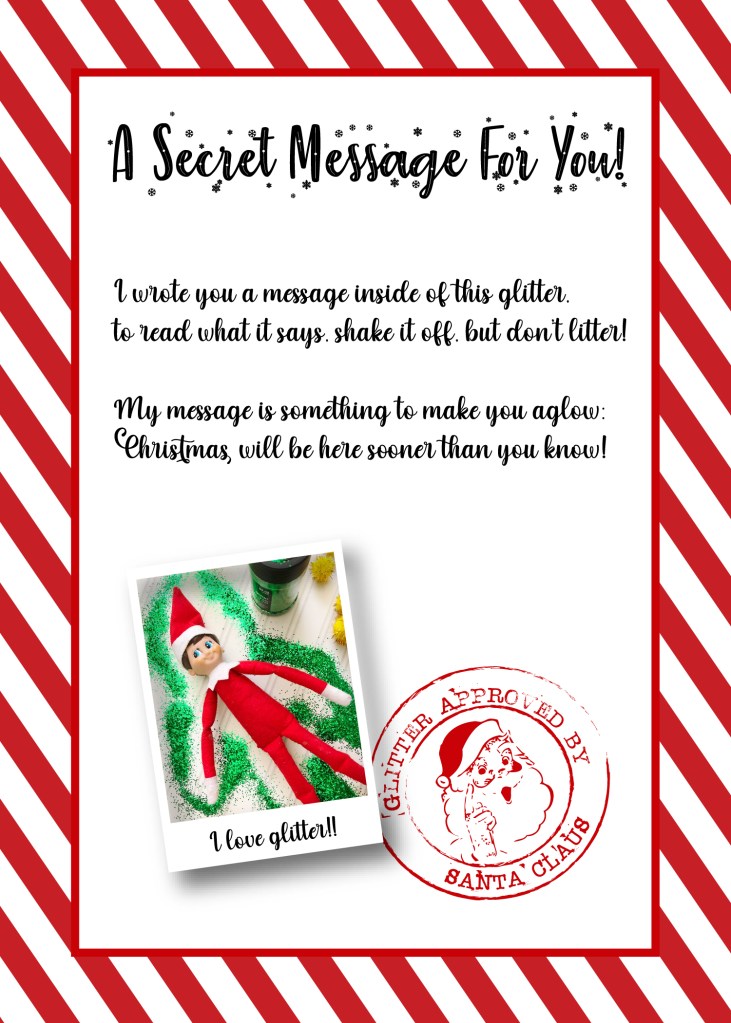
We all know Elves are full of mischief, and this idea does not disappoint! The kids woke up to our Elf sitting next to a plate full of glitter and a note that says there is a secret message hidden within. Our printable note has room at the top for you to personalize your message with your child(red)’s names and at the bottom for your Elf to “sign” his or her name.
To set up this scene, write a message in liquid Elmer’s Glue on a paper plate. The higher and more sturdy the sides of the plate, the better! Cover the glue in glitter until you can no longer make out the message. We chose to make our message: “Only 12 more days til Christmas!”.
When your kids shake the glitter off, they’ll be able to read the note their sweet little Elf left for them! …Let’s just hope they can shake the glitter off without much “littering”!
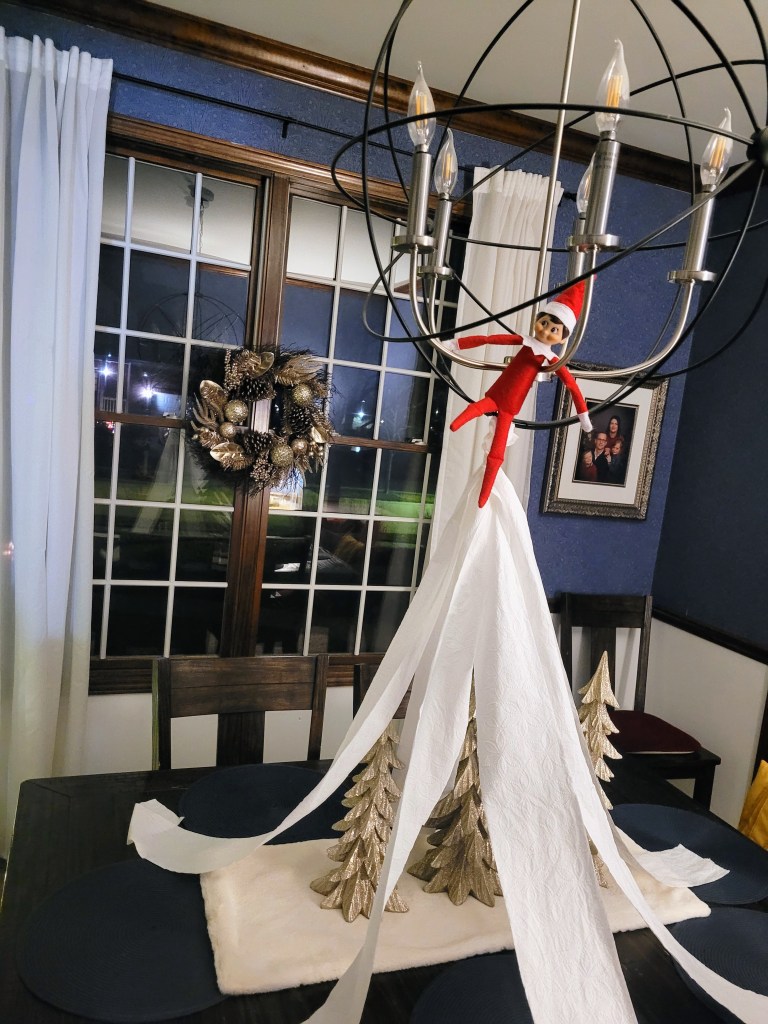
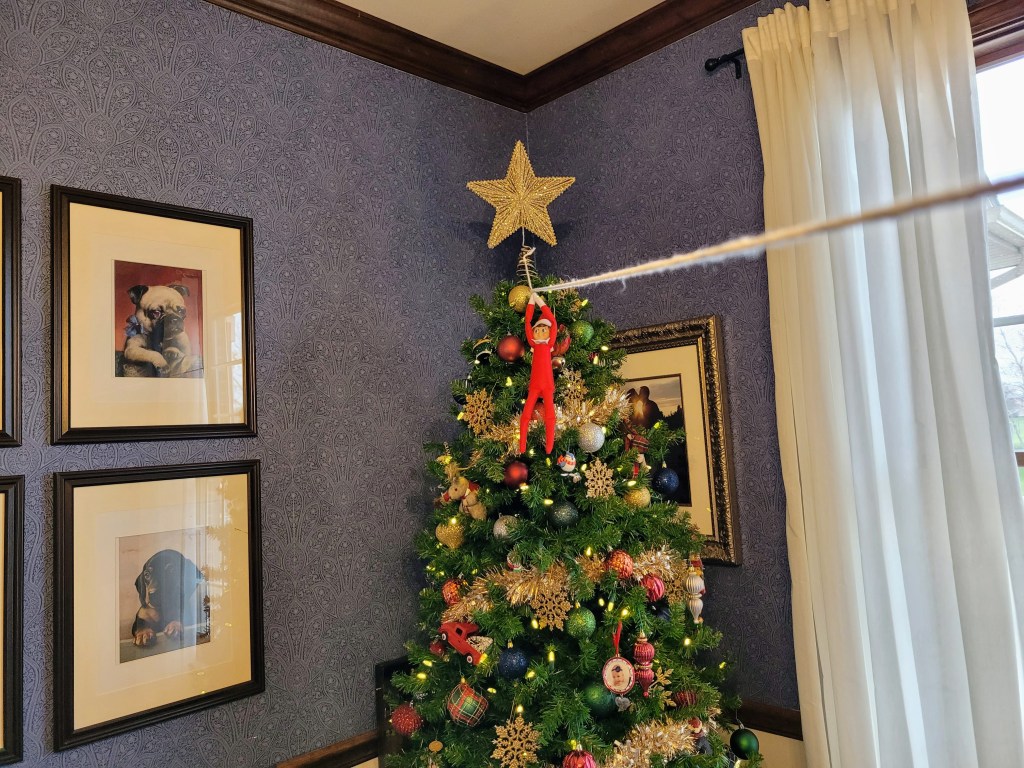
December 14 – Ziplining Elf
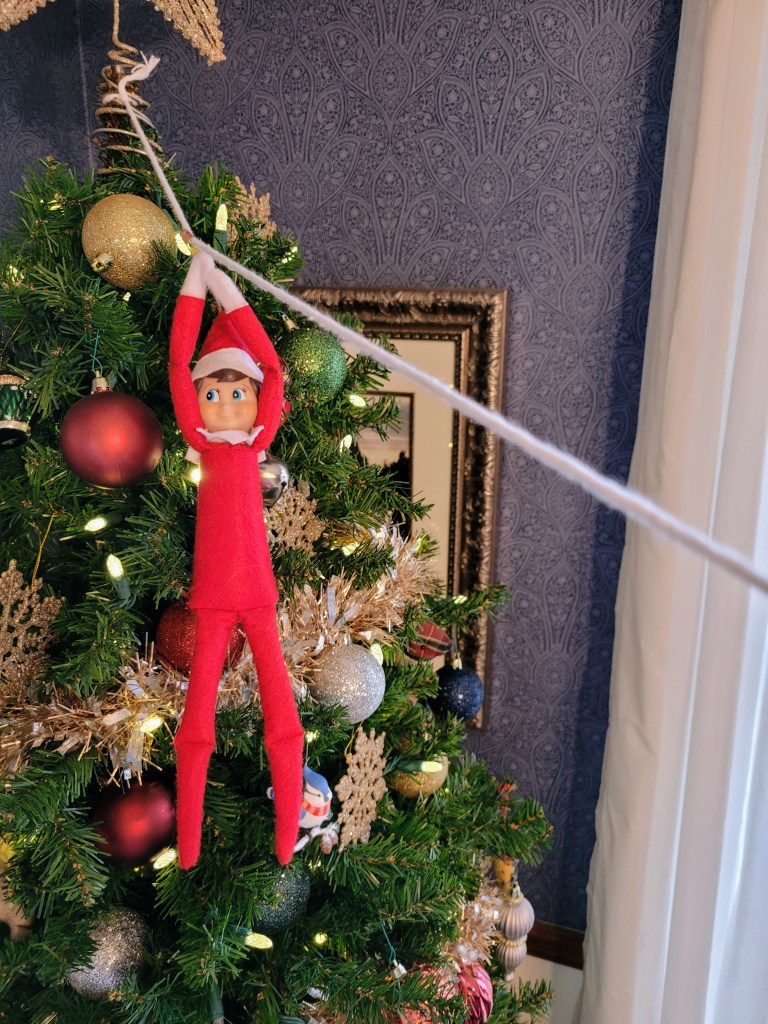
The ziplining Elf is one of my kids’ favorite Elf hijinks! Both of my kids squealed when they saw Buddy hanging from some string in our dining room. Every year, the Elf does this little trick and it never disappoints!
For this you’ll just need string or cord and something to attach the elf to the string. I opted for cooking twine and a safety pin since it was close. Hanging up the string is probably the more complicated step in this project – at least it was for me. 😐I attached mine to the top of our dining room tree and the lighting fixture over the table. The safety pin went into the backs of Buddy’s hands so it was out of my kids’ eyeline.
This one is simple but make sure you have two spots to hang the string from that are pretty secure. You’ll want the string pretty taut and that’s hard to do when one of the item moves (like a light fixture, ha!). Have fun watching your kids’ faces light up with this one!
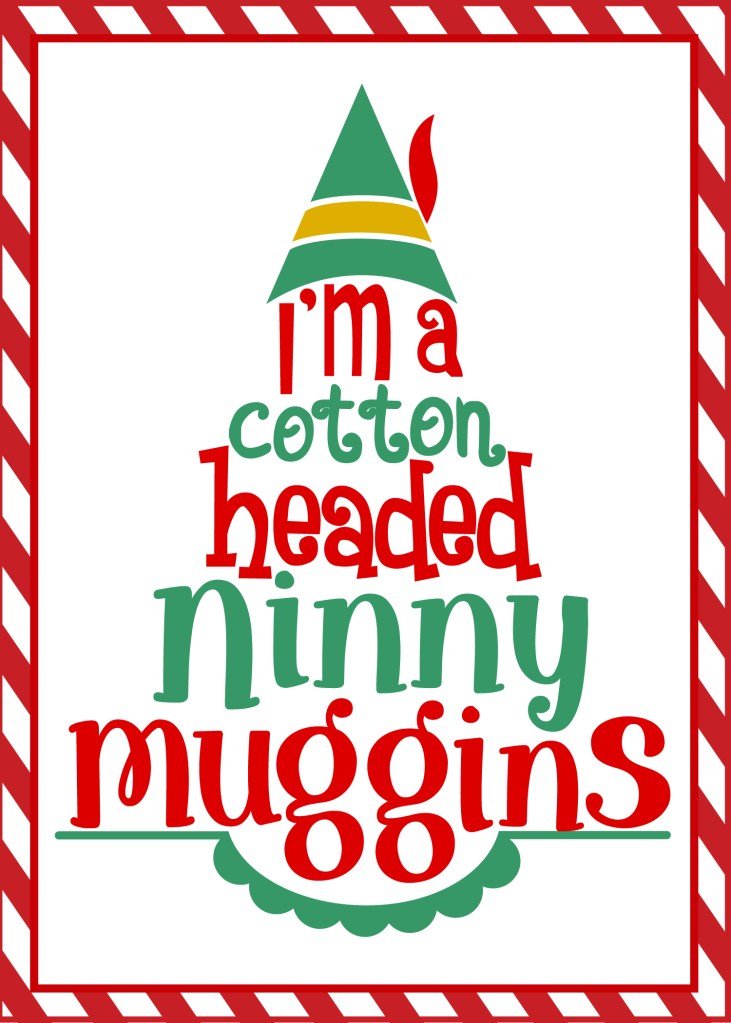
December 15 – Cotton Headed Ninnymuggins
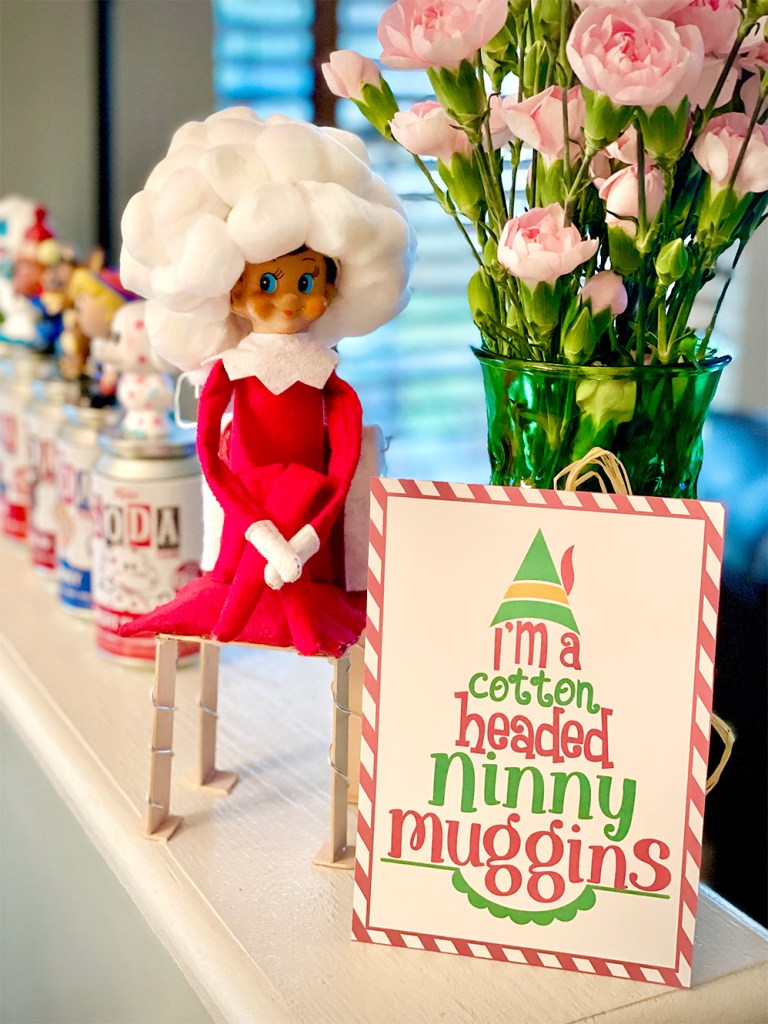
We are big fans of the 2003 movie Elf, and that is where this idea gets its inspiration. Sitting with a big, fluffy hat and a silly sign telling all of us he’s a Cotton-Headed Ninnymuggins, our Elf made us all smile this morning! My girls immediately recognized the reference to their favorite holiday movie, which made it all the more fun! They just couldn’t get over how our Elf made himself a silly cotton hat, and you might be wondering that, too, so I’ll let you in on the secret!
You’ll need a few simple supplies to get started, which you probably already have at home: cotton balls, tinfoil, and a hot glue gun.
Start by shaping a good sized piece of tin foil into a hat. I used a piece approximately 12″ long, which I immediately folded in half to make it a bit more sturdy. Then, I placed the tinfoil onto the elf’s head, shaping it right over his little elf hat. Fold and flatten the tinfoil onto itself until it becomes rounded and shaped like a floppy bucket hat.
Once you have the tinfoil to the shape you like, you can just start hot-gluing the cotton balls on. I also chose to glue cotton balls to the inside rim of the hat near the Elf’s face, so the tinfoil was completely hidden. I removed the hat from the Elf’s head to do this so I didn’t get any glue on him while I worked.
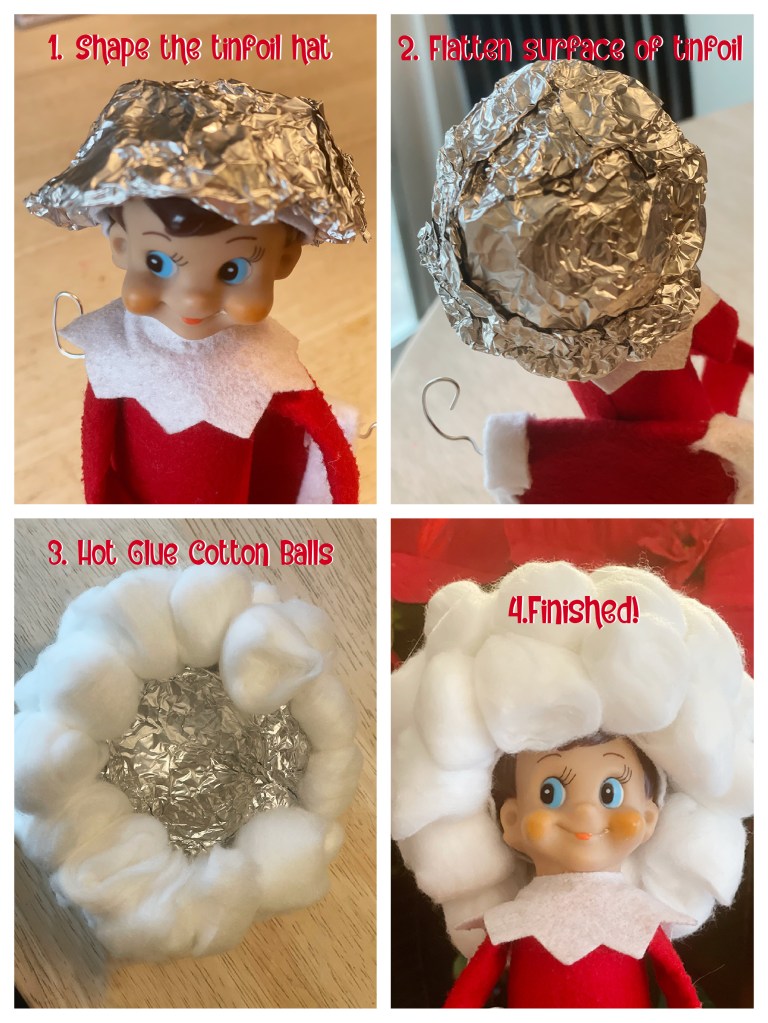
The hat did make our Elf a little top-heavy when he was wearing it, so just keep that in mind when you’re crafting your hat. I used a lot of cotton balls, but you could definitely pare down your hat to make it a little less substantial!
This was a very easy project that took me no longer than 10 minutes. It was definitely worth the giggles from my girls when they saw him and the silly little card that went with it! You can download the “Cotton Headed Ninnymuggins” card for your own use here.
I hope you have as much fun with this idea as we did! We would love to see your Elf’s cotton hat creations! Share your work with us on social media!
December 16 – It’s a Snowman!
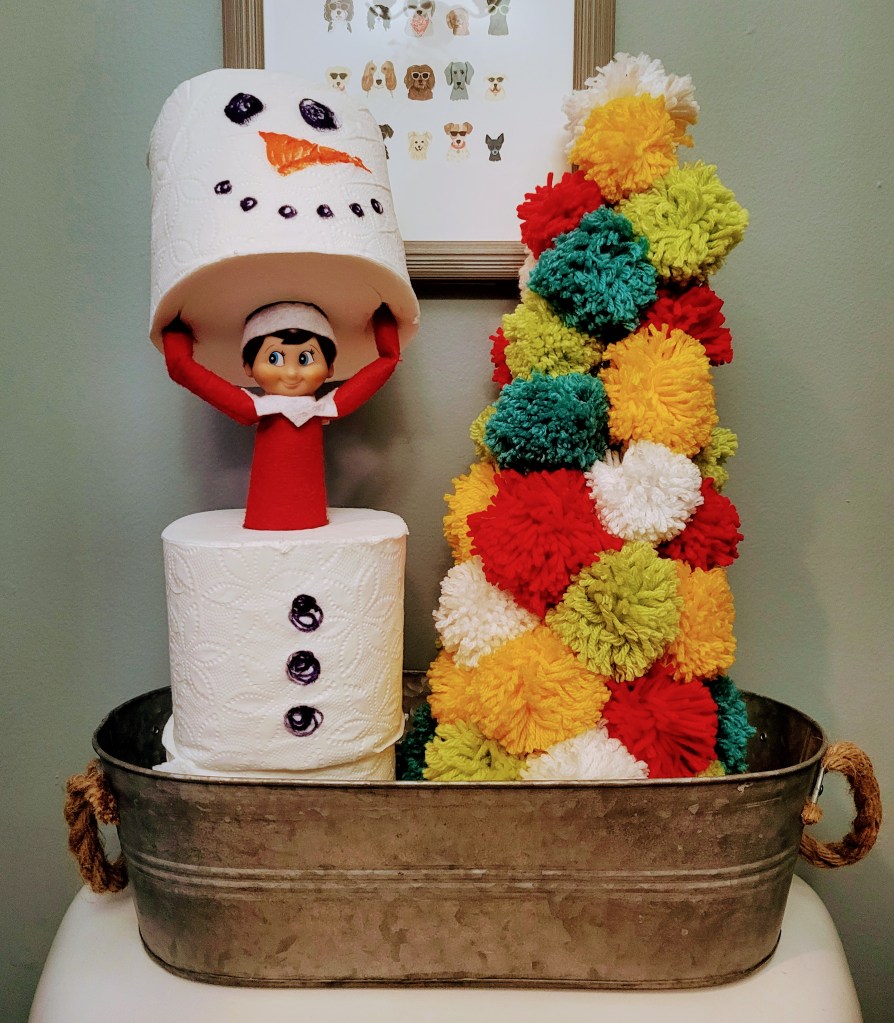
I personally love this idea for the Elf! I pulled it off with just 3 rolls of toilet paper and some markers (in black and orange). I used some of my kids’ Crayola markers and they worked great!
First, draw on the buttons, eyes, nose, and mouth with the markers. Then stack the button roll and the bottom roll. Go ahead and stuff the Elf’s little body in the middle and then stuff his/her hat in the top. For the hands, I just stuffed them in the roll but I’ve seen where people have attached them to the outside of the roll.
Just some troubleshooting tips – make a spot for the Elf’s hand by putting your finger in the layers of toilet paper and creating a space for it’s hands before you put them in. Also, since you are stacking some rolls you may want to consider putting them into a container so its less likely to fall over. I have it on the back of the toilet so a container was necessary. And there you have it! It only takes about 5 minutes or less to complete and your kids will really enjoy it!
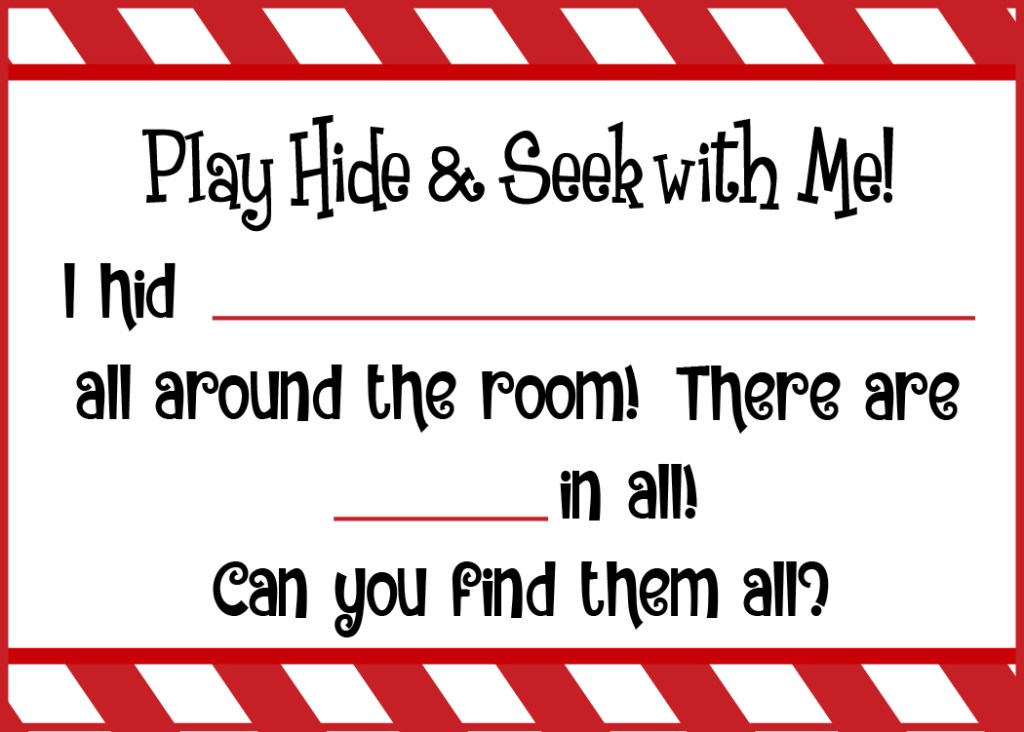
December 17 – Elf Hide and Seek

A little hide-and-seek is a great opportunity for your kids to get in some quality “playtime” with their Elf! This idea is so easy, and any form of Hide-and-Seek is always one of my daughters’ favorite games. As a bonus, it’s an activity that will keep your kiddos busy (at least long enough for you to enjoy a cup of coffee!)…AND they’ll be using their math skills to be sure they gathered up all the items!
To pull it off, you can use multiples of any item to hide around the room, but for our version, I chose these cute mini stockings and stuffed each with a piece of candy. Our printable instruction card lets you fill in the blanks and customize your game to any fun little items you have around the house!
I left the first two of the stockings near the instruction card so the kids knew exactly what items they were looking for. Then, I filled in the first blank space of the card saying there were “more of these stockings” around the room, and the second blank space told them that they would find 10 stockings in all. You can print the card for your own use here!
My kids had so much playing this game, and said this was one of their favorite activities that the Elf brought for them this year. Best of all, you can make this fun using multiples of any holiday-themed items you have on hand!
December 18 – Cut Your Own Christmas Tree Treat
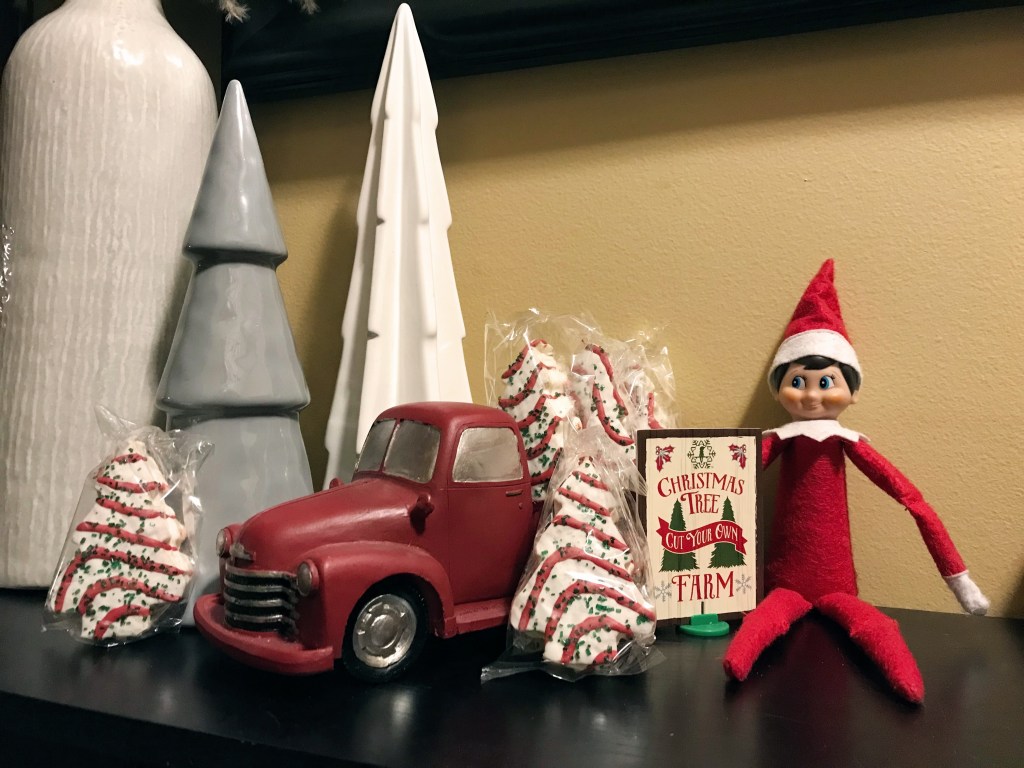
The Elf is selling Christmas Trees today! For this Elf idea, you’ll just need Little Debbie Christmas Tree Cakes (or something similar), a Christmas/Holiday Truck and if you are feeling extra, a Christmas Tree Farm sign. I happened to have this one from a Elf kit I purchased years ago but you could easily make your own on a computer or other.
I decided to place this in our foyer next to some ceramic trees to really give it that tree farm vibe. You could also put this by any evergreen decorations, near a Christmas mini village or even near a dollhouse or super hero figures, etc. This idea was new this year and I was pleasantly surprised on how cute it turned out. My kids loved the fact that the Elf brought treats too!
December 19 – Your Elf Mustache you a question!
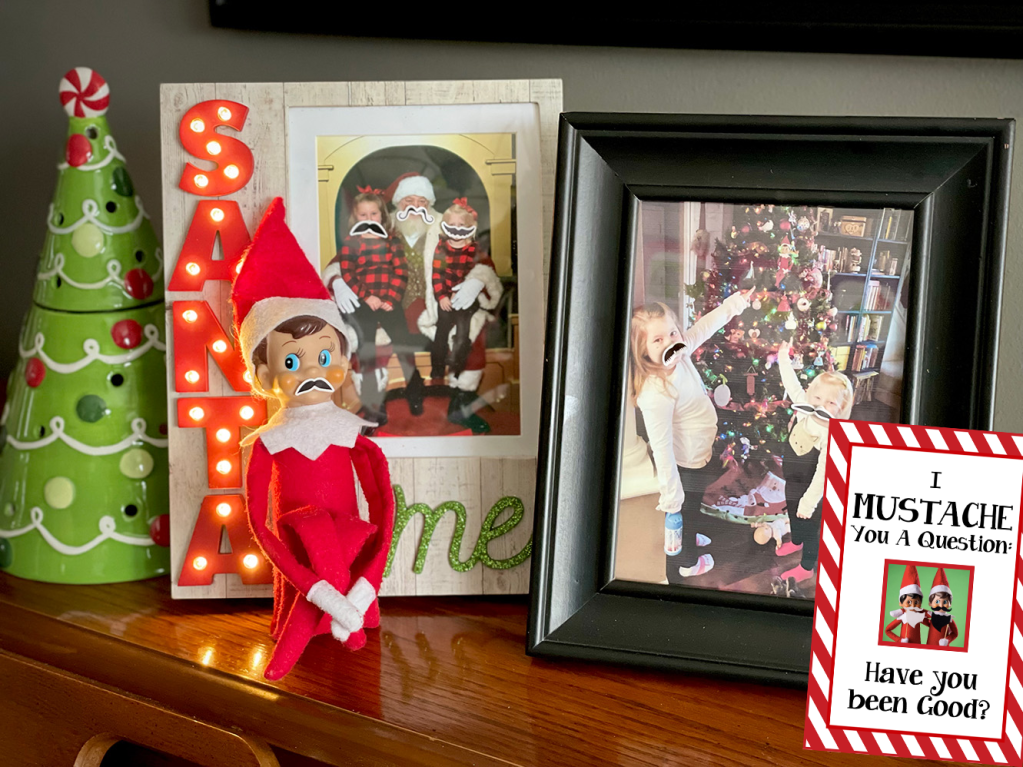
Our Elf was up to mischief again last night! He went around and put mustaches on all of the girls’ photos, and even put one on himself! He really MUSTACHE the girls a question: Are they being good?
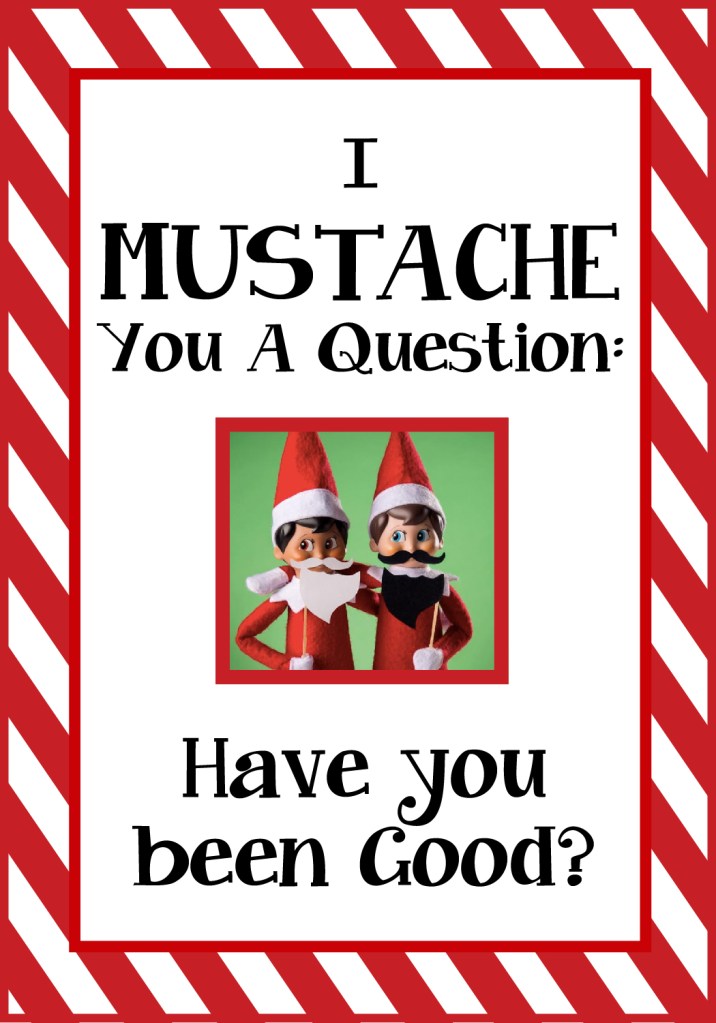
This idea is very simple to pull off. All you do is add little mustache stickers to nearby photos and to your Elf if you’d like him/her to have one (we used these). Our free, printable card asks the question every Elf wants to know less than a week away from Christmas: Are your kiddos being good? However, you could make your own note asking any number of questions to your kiddos: Are they keeping their rooms clean? Are they listening? Finishing their homework? Do they simply like the mustaches the Elf put on their photos? Use what works for your family, and have fun!
December 20 – Getting into Trouble with Toys
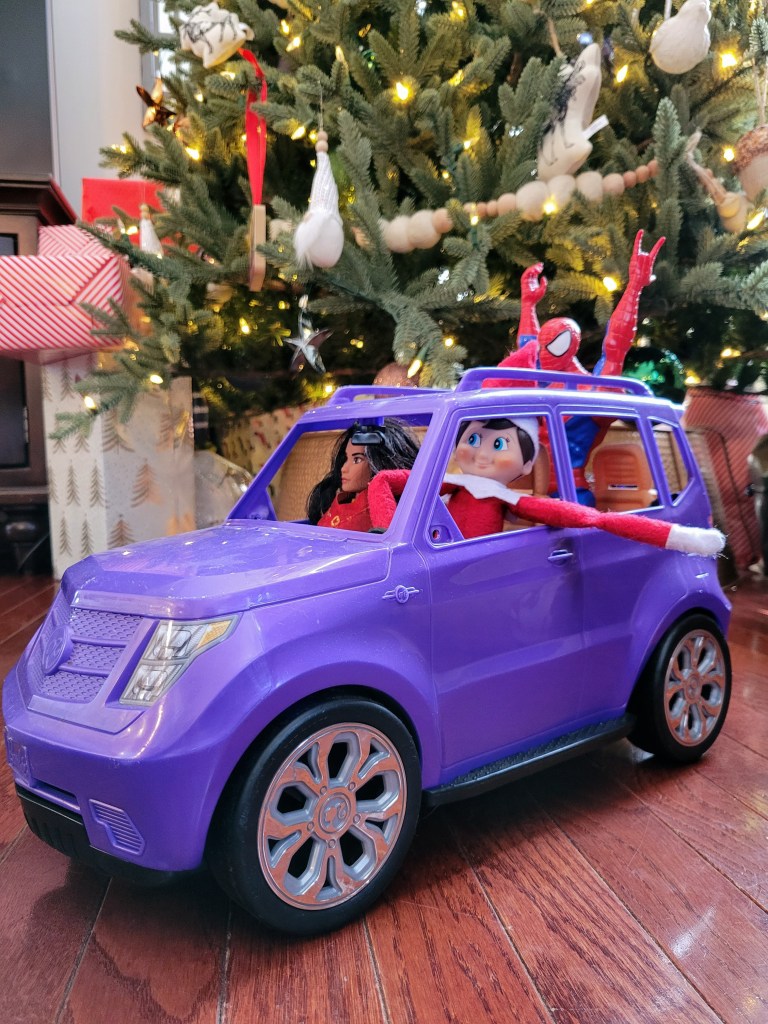
Buddy the Elf borrowed Barbie’s SUV and took a joyride with his friends! Your kids will enjoy the thought of their Elf having fun with their toys overnight. For this idea, I gathered a couple of dolls, a Barbie car and put together a cute scene. The more “trouble” the Elf gets into the better! My kids loved this!
I like this idea because it is very versatile with many options for variations. The variations could be the Elf riding something, the Elf getting ran over by a toy or getting stuck in a toy – the options with your child’s toys are endless. Earlier this month, I also had Elf riding a toy moose! Have fun getting your Elf into some trouble!
December 21 – Naughty-Nice Clothespin Chart
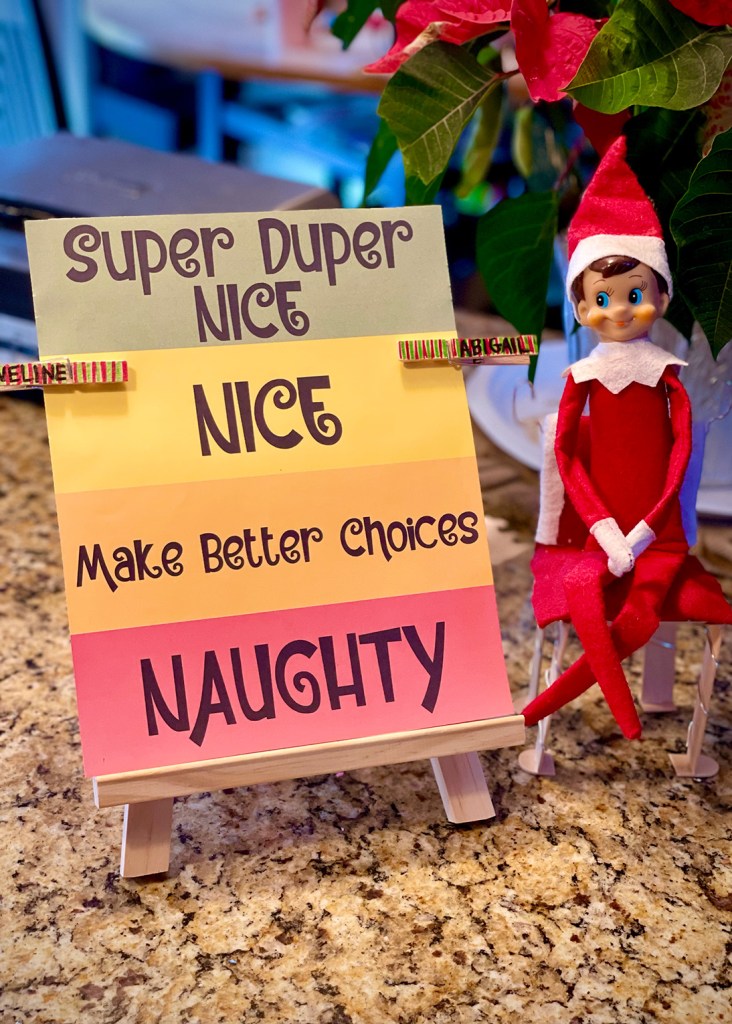
Our Elf sure is encouraging the kids stay on the “Nice” list this year! He brought this Naughty/Nice Clothespin Chart to show the girls exactly where they stand with Santa these last few days before Christmas!
Both of my girls were happy to see they’re currently on the “Nice” list, but were definitely encouraged that there’s still time to get on the “Super Duper Nice” list! They were brainstorming with the Elf this morning of things they could do to get their name markers moved up a notch. I think they will definitely get to the Super Duper Nice category before these next four days are over! (*wink, wink!*)
Our free printable chart makes this a very easy Elf setup. Aside from the chart, you just need some type of “markers” to show where each child ranks on the chart. I used these clothespins that I colored with my girls’ crayola markers and then wrote their names over the striped design. If you’re feeling extra fancy, you could paint the clothespins, or have the kiddos decorate them if you decided to just write their names.
If you didn’t want to use the clothespins at all, you could just as easily use stickers, or any other item stuck to the chart with tape or sticky tack to indicate where your child(ren) stand on Santa’s list.
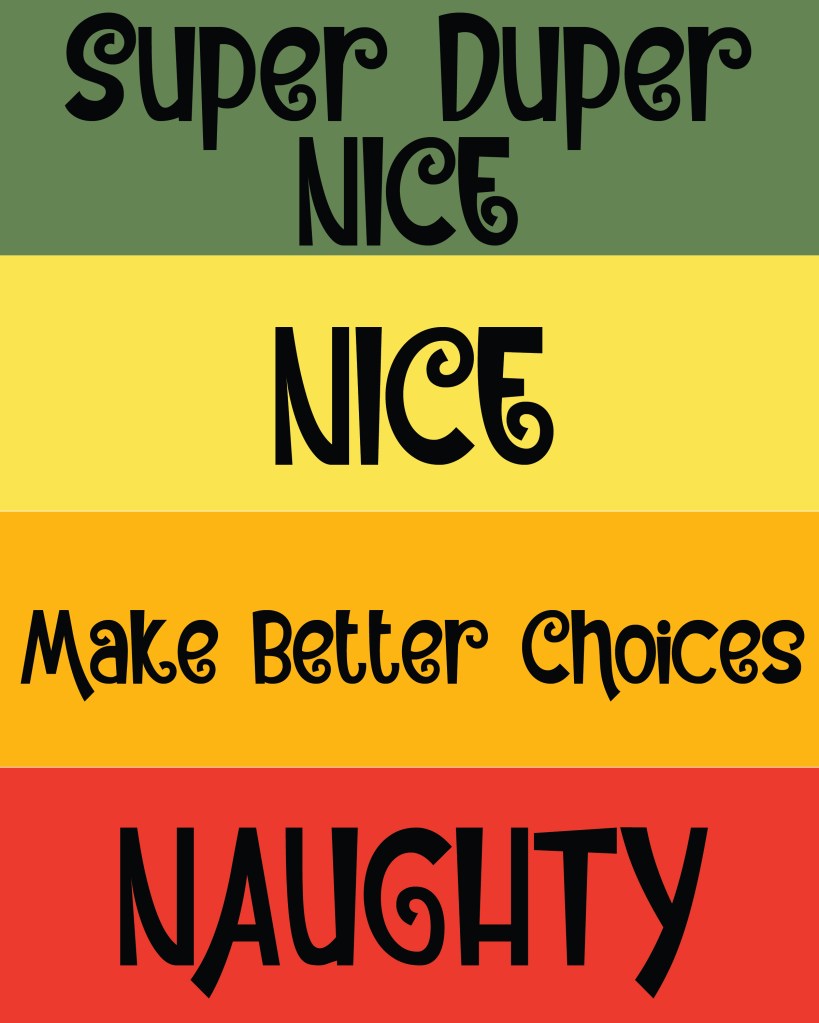
This chart can be used for multiple nights so if you’re feeling the need for a break, use the chart for a couple nights in a row! You could leave a hand-written note on the second night encouraging your kiddo to keep that “Super Duper Nice” ranking! This is a great way to remind your kids to keep that “Christmas Spirit” in mind these last few days before the holiday is here.
December 22 – Hiding Elf
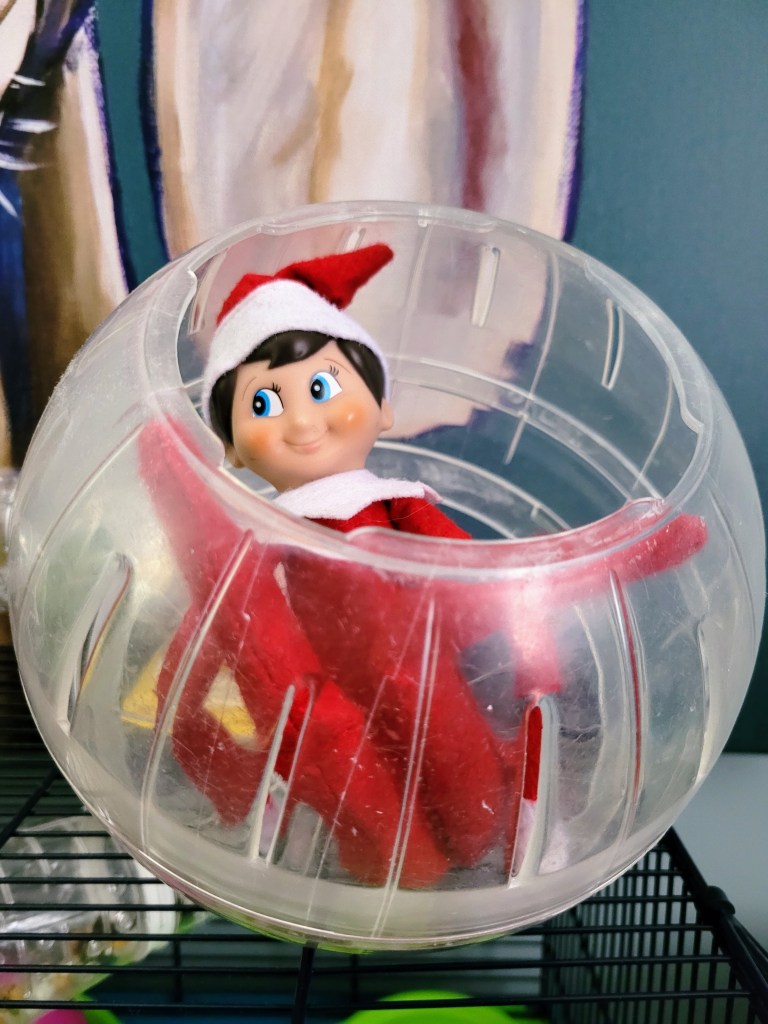
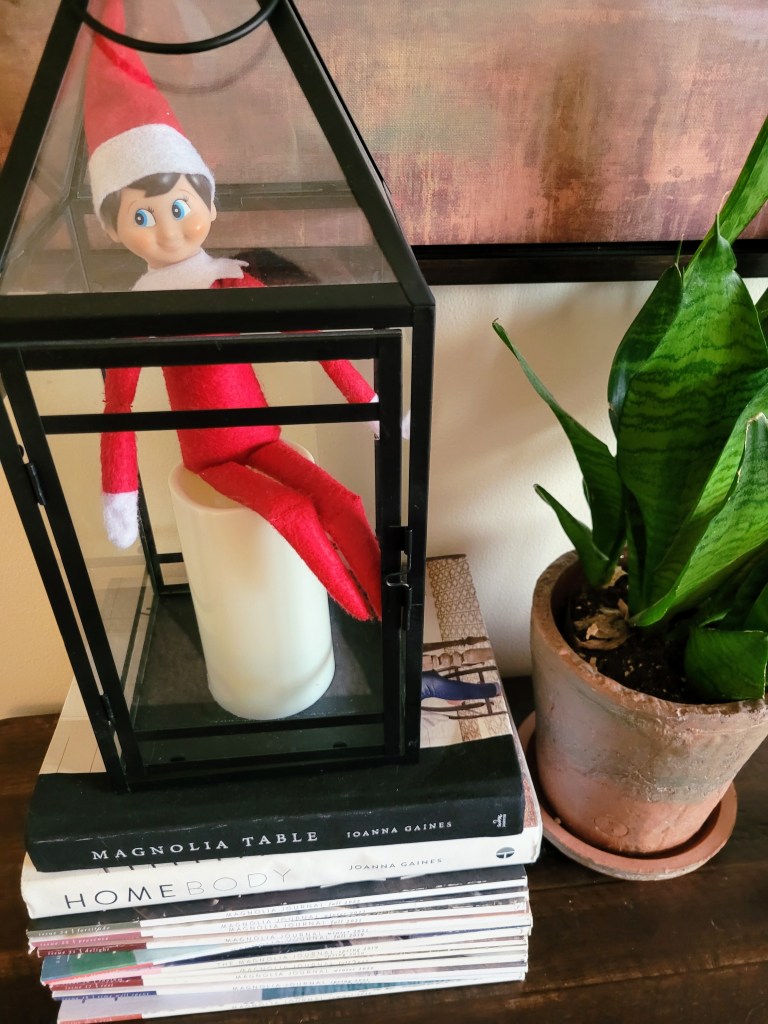
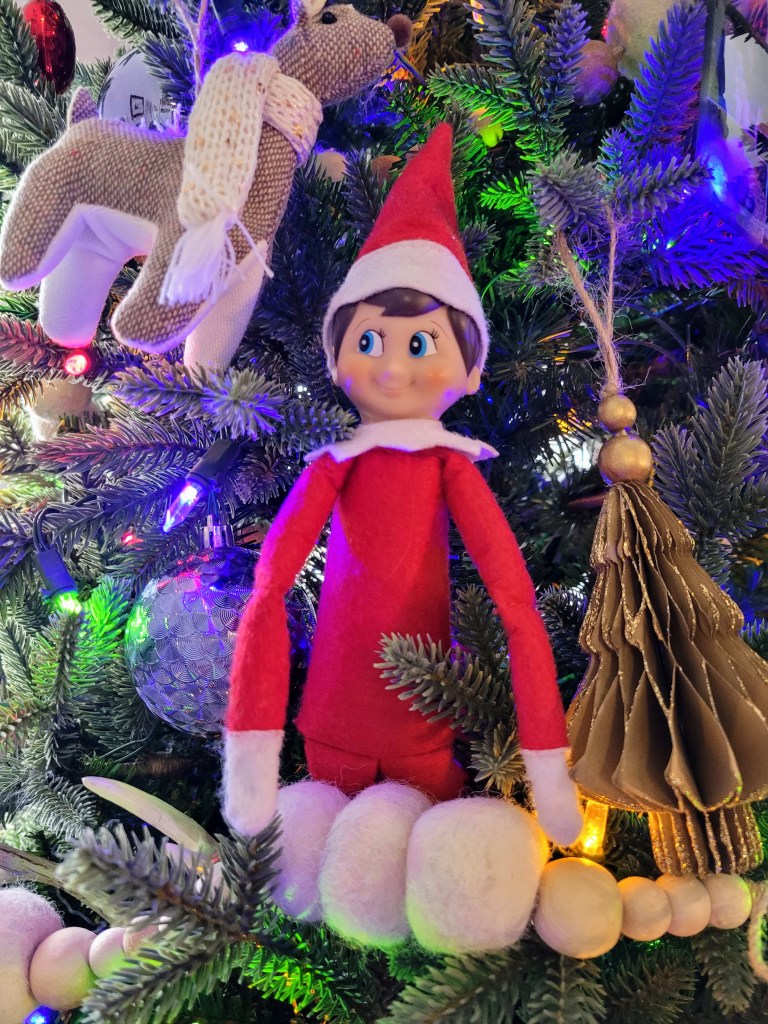
We are in the final stretch folks! I love the magic of the Elf but man, I could use a break! So today, I am just going to share some of Buddy’s hiding spots when I just wasn’t really wanting to do much. Hopefully, these will give you some ideas for these final couple of days.
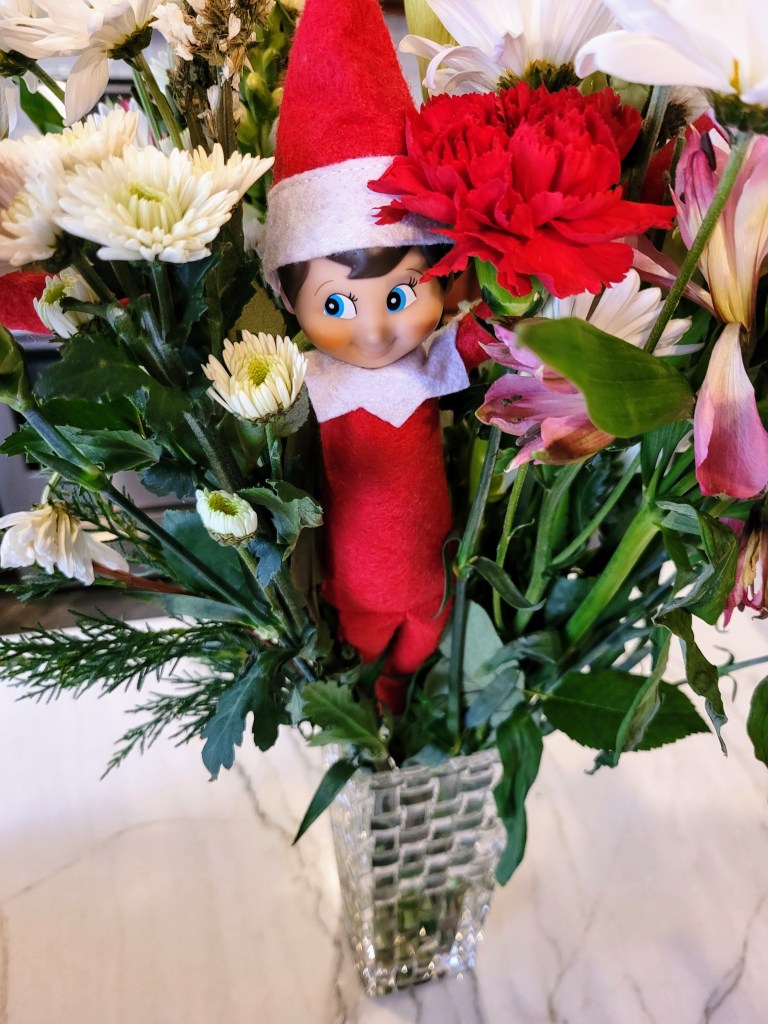
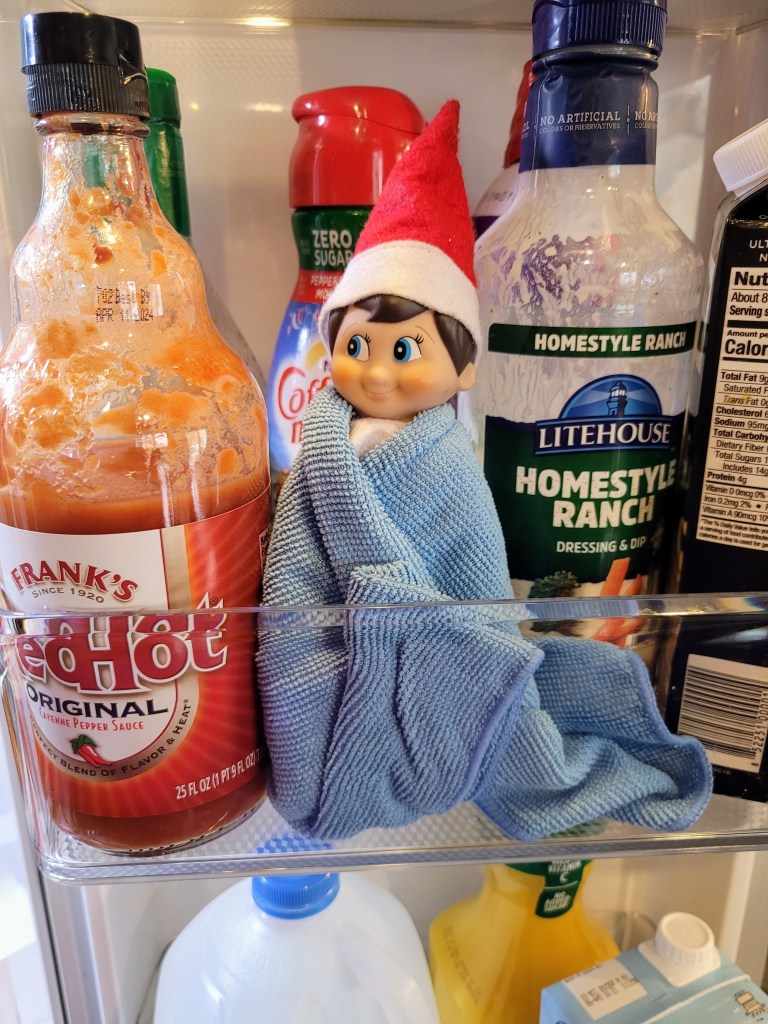
I try to do new hiding spots each year but some just make the rotation from year to year because the kids are so entertained by them. The Elf in the fridge with a blanket is classic and will never get old in our house. Two other ideas that I use yearly is Buddy in the tree and Buddy “stuck” in the lantern. My new spots included putting Elf in the hamster ball and putting him in my birthday flowers. Buddy was nicely camouflaged among the flowers so it took awhile for the kids to find him.
With only a few days left, hopefully these ideas will get you to the finish line! For the next couple of days, we will be sharing some ideas for the final night before Elf leaves for the year. Stay tuned!
December 23 – Gifts from the North Pole
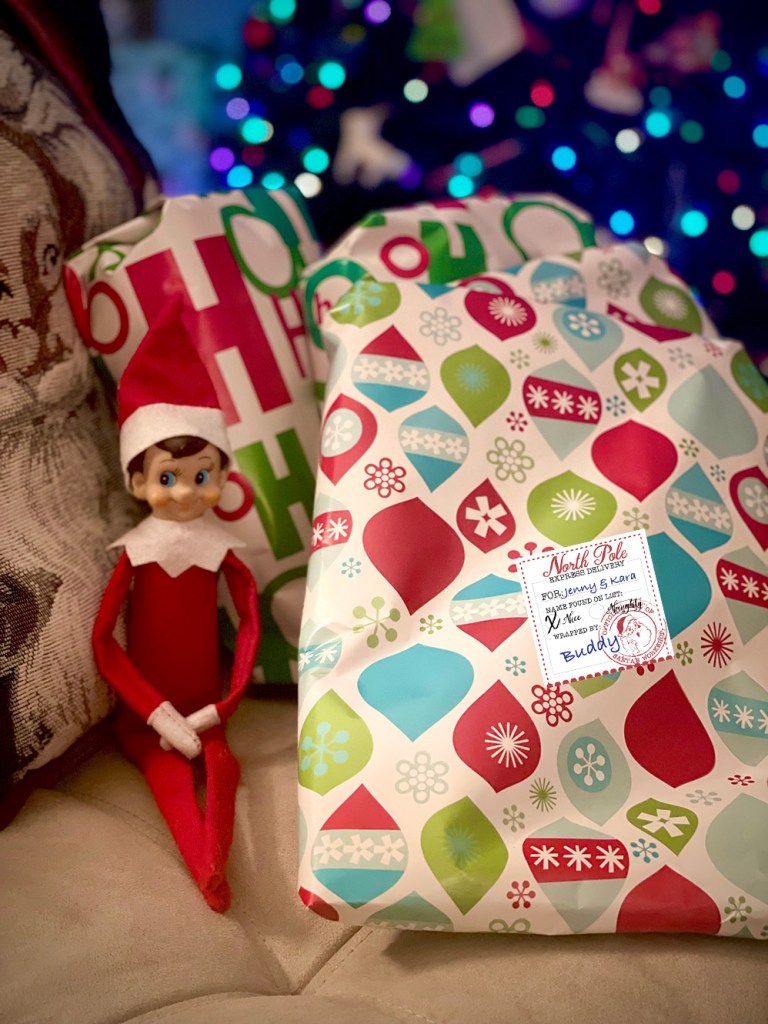
One of our favorite holiday traditions is matching family pajamas for Christmas morning. Every year, it’s a new theme, usually something we really enjoy as a family (Star Wars or Marvel), or just something cute that fits our family.
I especially like the tradition we have begun of the Elf being the one to bring the pajamas. The kids love getting a little gift from him, and it makes it extra magical coming directly from the North Pole! Usually, I put these out for Christmas Eve morning, but this year I’m changing it up a little and putting out a day early (we have an adorable idea in store for tomorrow night, the Elf’s last night with us!)
This idea wouldn’t be complete without a very official-looking label brought to us directly by our Elf from Santa’s Workshop at the North Pole. I’m sharing these labels with you here! There’s space to write your child’s name and who the gift is “from”, usually either Santa or our Elf.
Our labels are already set up for Microsoft Word with printable 1.5″ x 1.5″ Avery Labels – 22805. Hope you enjoy this idea, and the special label to go along with it!
December 24 – Hugs & Kisses Goodbye
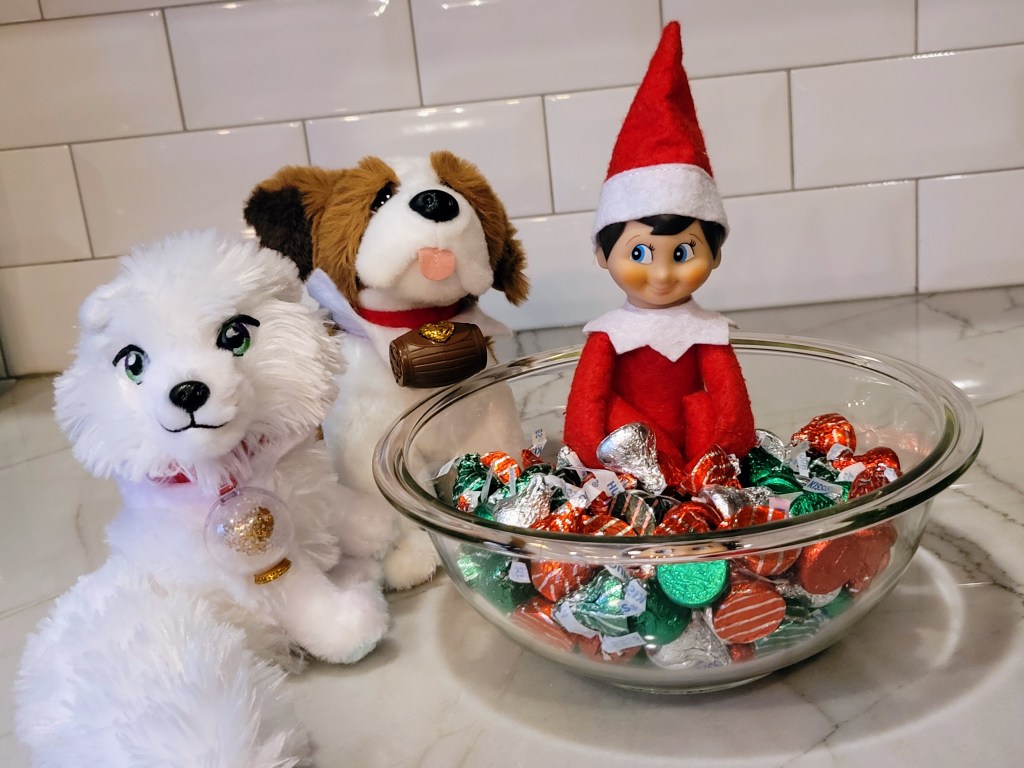
Unfortunately (or fortunately 😉) we have to say goodbye to the Elf! My kids truly love the Elf and await it’s arrival every year and to see what he has been up to each morning. I definitely get annoyed some nights with it but it is worth all of the trouble to see my kids’ faces light up each morning. This year we are sending off Buddy the Elf with hugs and kisses. He will be collecting his pets and heading off to the North Pole.
All that’s needed for this idea is a container or bowl and a bag each of Hugs and Kisses. Sit the Elf down in a container or bowl and cover his lap with the chocolates. I am placing his pets around the bowl as a gentle reminder that they will be leaving too! I put together a short note from Buddy bidding his farewell to the family as well. It’s a nice way to say goodbye especially for kids that may be emotionally attached to the Elf and/or it’s pets.
Jen and I truly enjoyed putting together this post! We hope that you were able to either follow along with us or at least find some ideas to use in your home. We will be back with new blog posts in the New Year but for now, we hope you enjoy your holidays and find some time to have fun and relax with your family! Happy Holidays and Happy New Year!

Undefined Structure began in 2022 between mom-friend duo Kara and Jen. Years of being friends and sharing common SAHM experiences showed us our struggles and achievements could be relatable to other Moms; and so we started this blog. Our worlds are full of colorful and unexpected touches, while also having a good dose of crafty organization – our goal is to share it with you and to keep our homes and family life inspired and running with a bit of grace.

One response to “The Tired Parent’s Advent Calendar: 24 Days of Elf on the Shelf Ideas”
[…] hope that you will check back with us each day for fresh Elf-spiration. Be sure to check out our 2022’s 24 Days of Elf on the Shelf Ideas Blog Post for even more […]
LikeLike